Sometime ago, we wrote about downloading PDF files from the web and overcoming Power Automate’s limitations when doing do. Since then, lots have happened and evolved within the tool, and several features have been added.
The main change is that Power Automate used to have 2 recorders, one for web actions and a second one for “desktop” actions, but we now have a unified actions recorder that covers both. As a result, the process to set up an automation to download files has changed a bit.
In this post, we will cover the following scenarios:
Any File downloaded directly from a link (zip, xlsx, docx, csv, pdf, etc). Example: in this web page, all the links listed are a download link that you can click on and will automatically try save the file to your PC
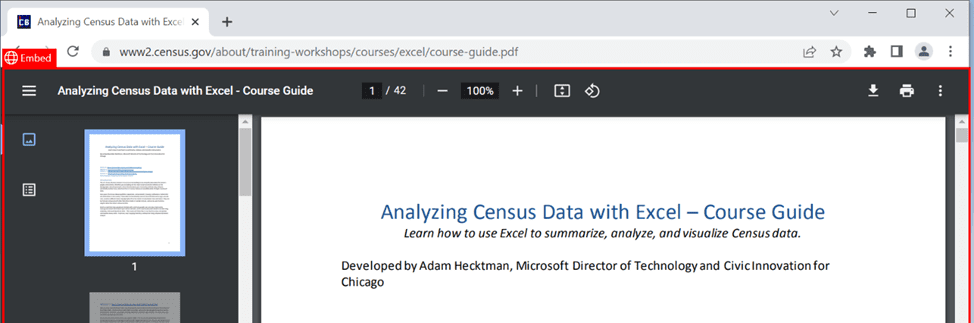
PDF file opens in document reader and you have to click on a button to download. Example: in this web page, the “Course Guide” link will take you to a PDF file viewer, on which you can click to manually download.
In addition, we’ll go over the important question of: Where will your files be saved?
Files downloaded directly from a link or button.
This is the easy one! You’re lucky if your files are downloaded this way. All you have to do is to record the actions that will take you to the file and that will do it.
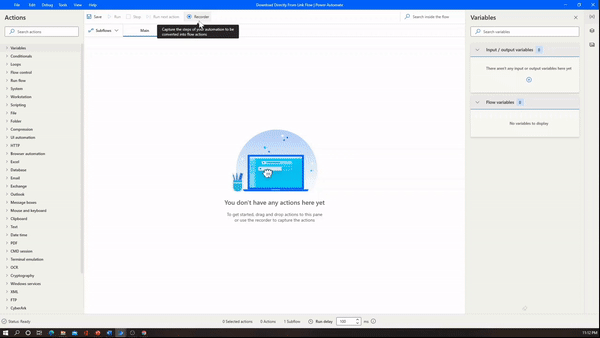
Just click on “Recorder”, start a new Chrome browser and record your actions!
Your files will be downloaded right after the download link or button is clicked.
PDF files opened inside document reader
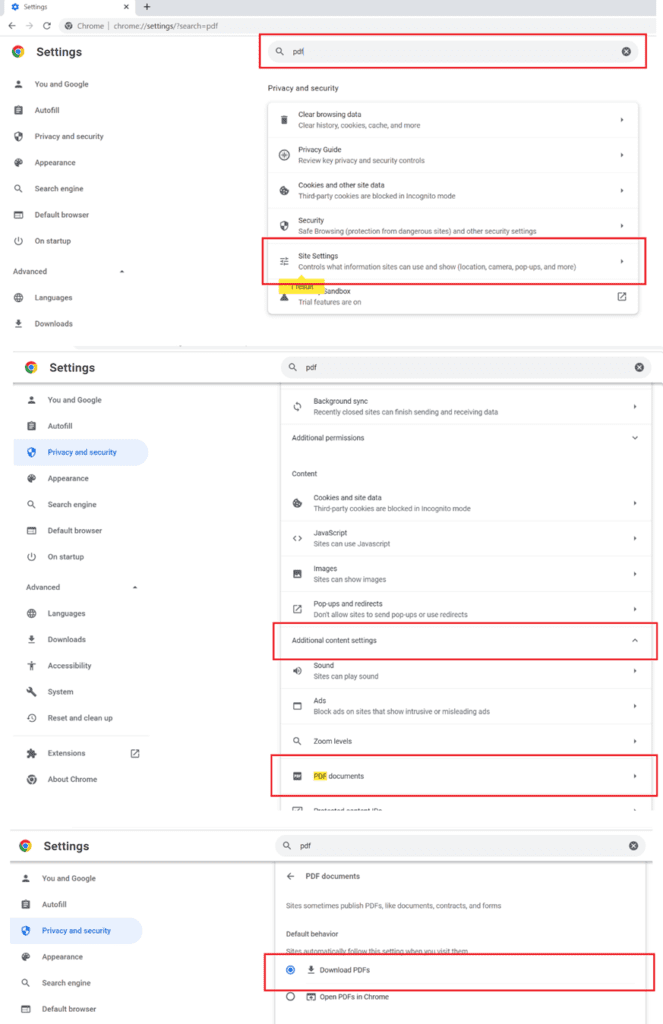
Option 1: set up your browser to download files instead of showing the document reader.
The first option if changing the browser to set PDFs to save automatically instead of showing in Chrome reader
Option 2. Set up some UI Automation steps to handle the “download” process
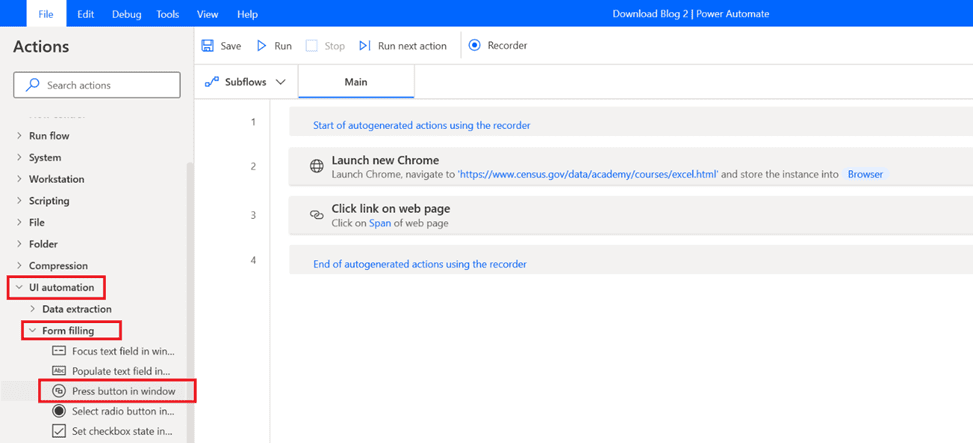
First things first, we need to record the required steps to get to our file. Once the file opens in the reader, either in the same tab or a new one, you’ll notice Power Automate doesn’t recognize the download or print icons, it only recognizes the reader a whole element.
IMPORTANT! If you have more than one monitor connected, it’s recommended for you to disconnect one of them, some bugs have been reported in recognizing desktop elements from Power Automate when more than one monitor is connected to the PC.
Once you reach the point where your file is showing in the document reader. Stop recording and go back to Power Automate.
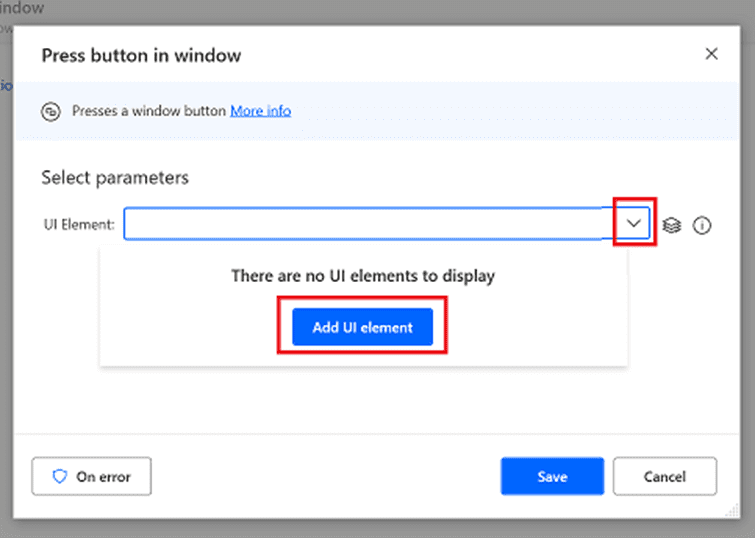
Expand the “UI Automation” section, then “Form filling” and drag and drop to the canvas the “press button in window action”.
It will ask you which element you want to click, just click on “Add UI Element”
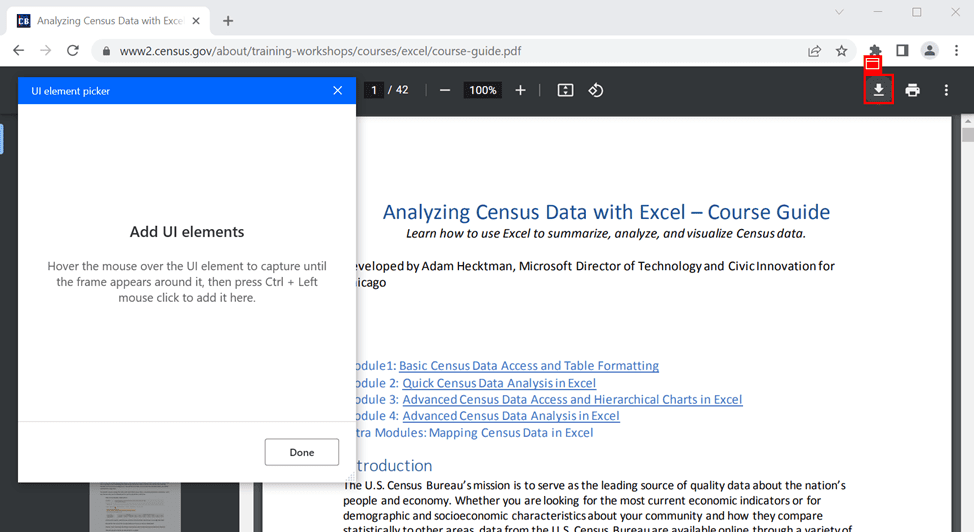
A small window will show up, and whenever you hover over an item in the screen, you’ll see a red square around it.
Hover over the download icon, and once the red square shows up, Left click + Crtl.
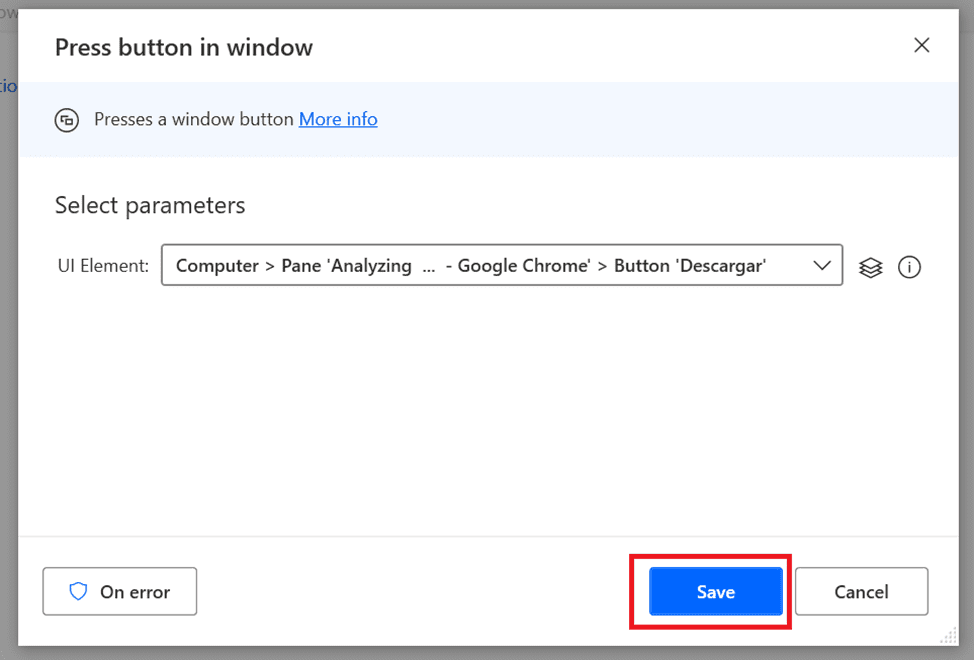
Click done and then the UI element will be selected. Just click Save.
Ok, now you have the steps for getting the file to download. In our next section we’ll talk about how to handle the location of where your files will be saved.
Where will your files save?
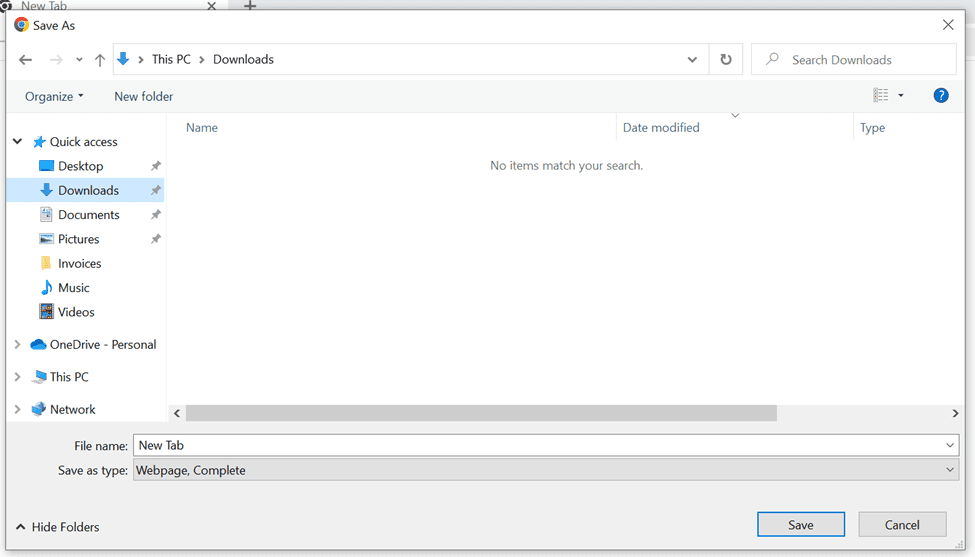
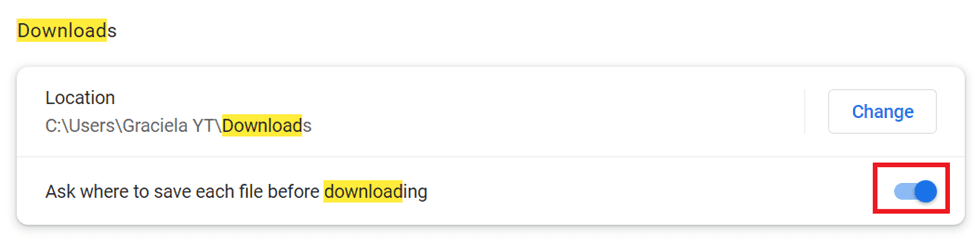
Browsers allows to set up a default folder to save all downloads or to ask you every time a download happens where to save – the right choice will depend on the process you want to set up.
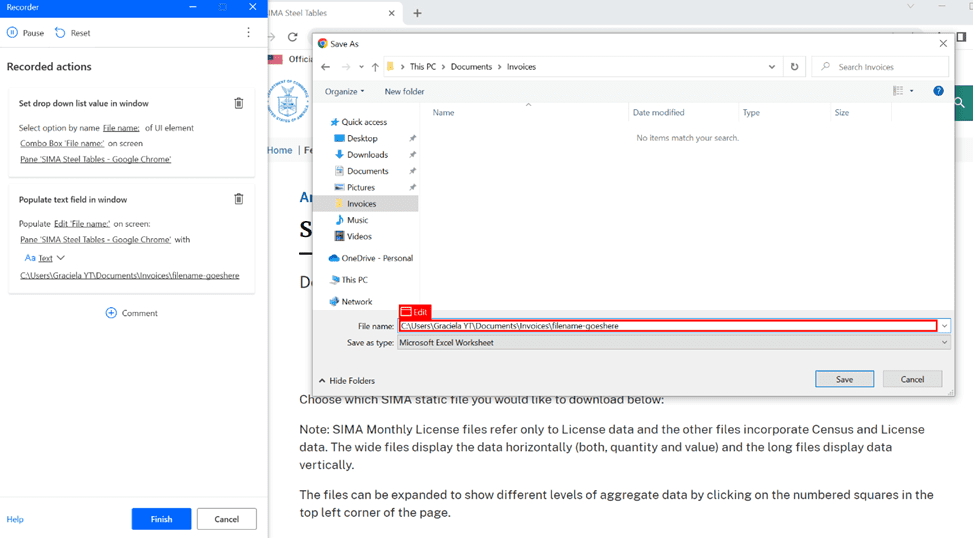
Option 1. Define where file will be saved before downloading
This means that whenever you download anything, you’ll get the following window requesting for you to select a location for the file
First, make sure that you have set up your browser to always ask where to save new downloads, this can be done for both Chrome and Firefox.
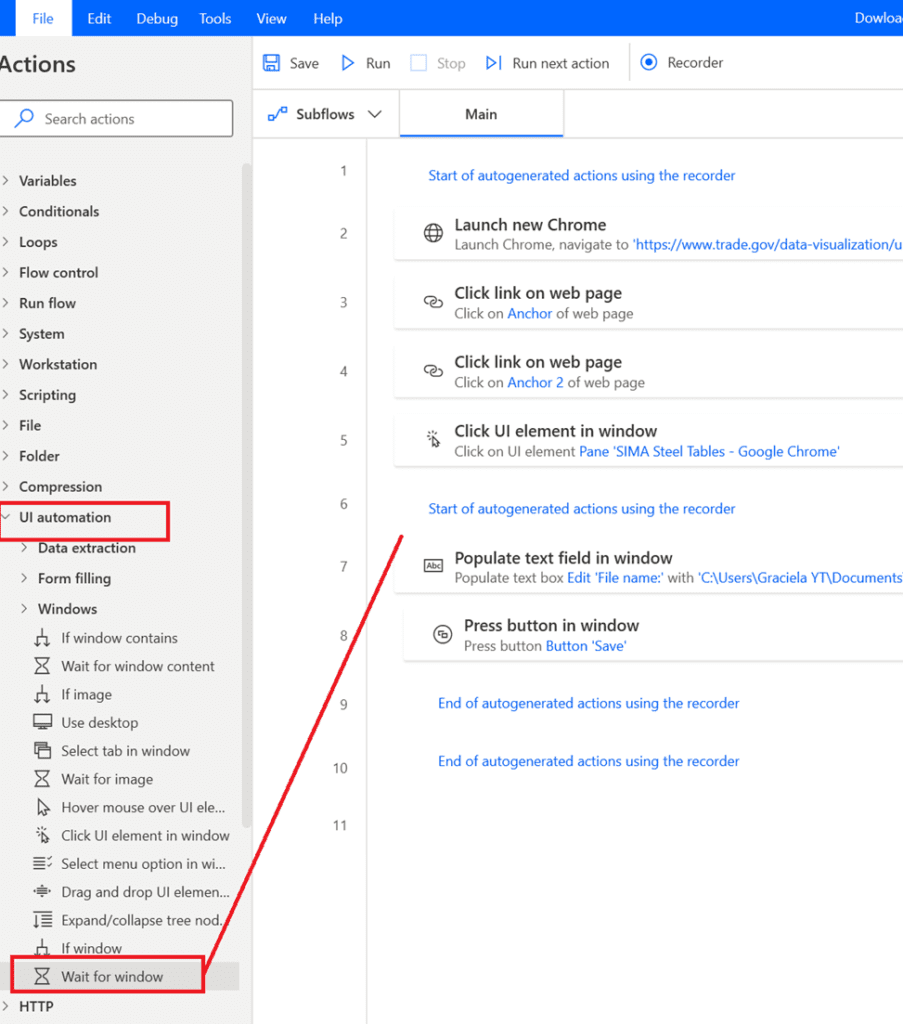
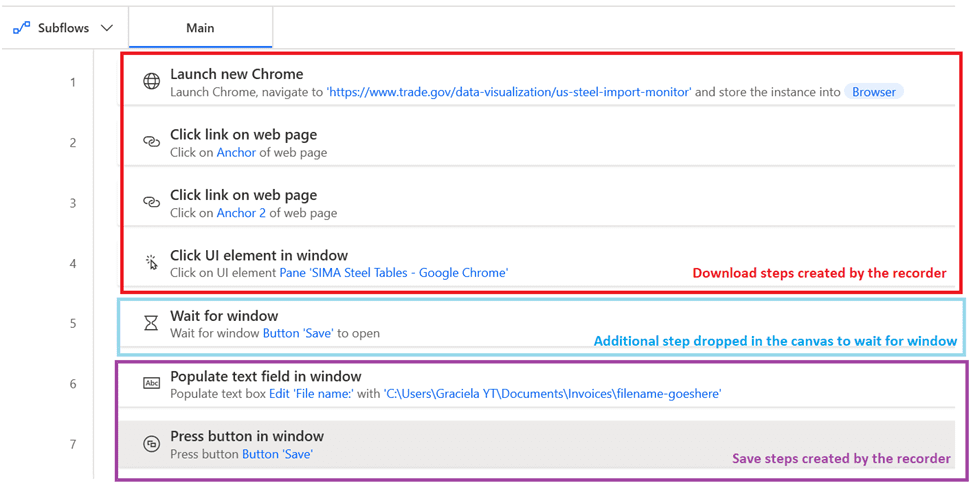
Let’s go back to Power Automate and Record some additional actions:
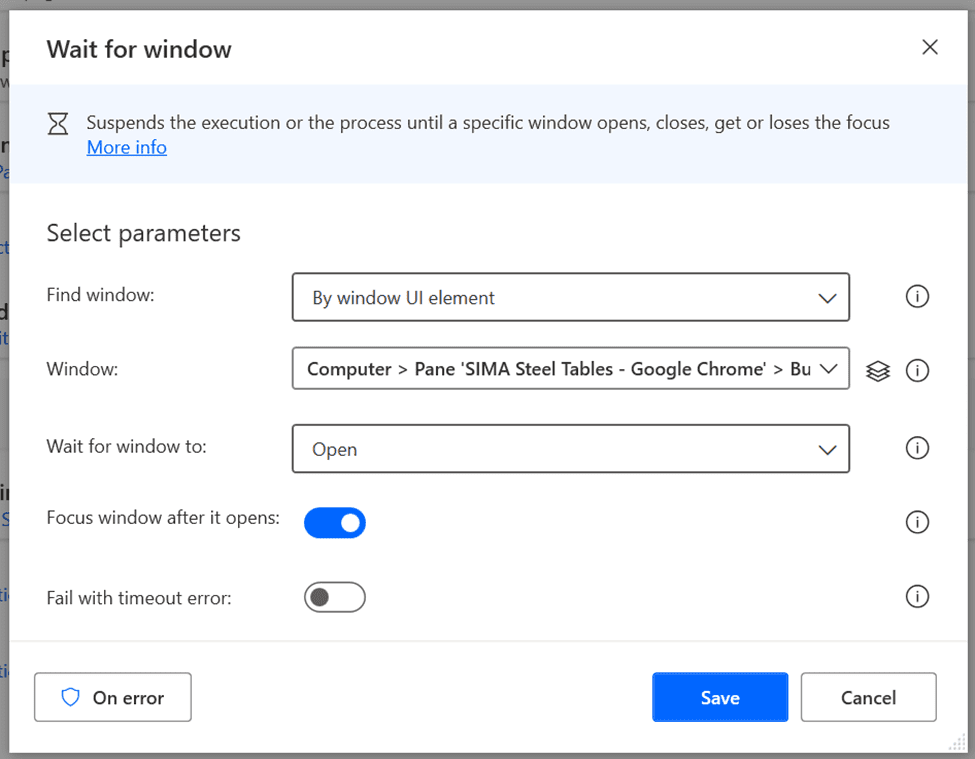
Now we have the steps to save the file in our desired location, but Power Automate sometimes is too fast so it tries to type the file name before the window becomes even visible. Let’s add a little step to help us on this: Drag and drop Wait for window
Select the window and then “Open” in the “Wait for window to”
Your flow should be looking like this now:
You can also add some steps to add timestamp to the file name when saving the file.
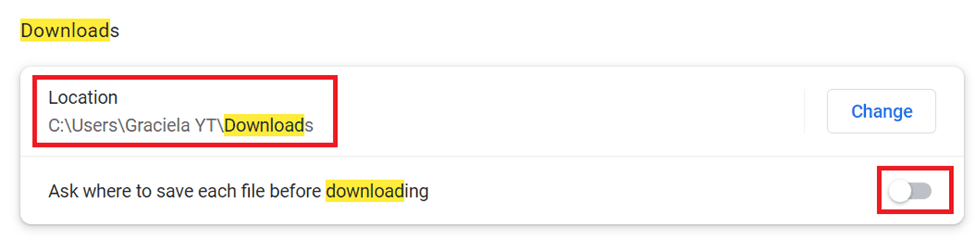
Option 2. Download the file in the Default browser folder and then move it to the right location
Above set up might not always work, sometimes the window that asks for the file name has a dynamic title and this can be a HUGE issue. But, don’t you worry! There is still a great workaround for this.
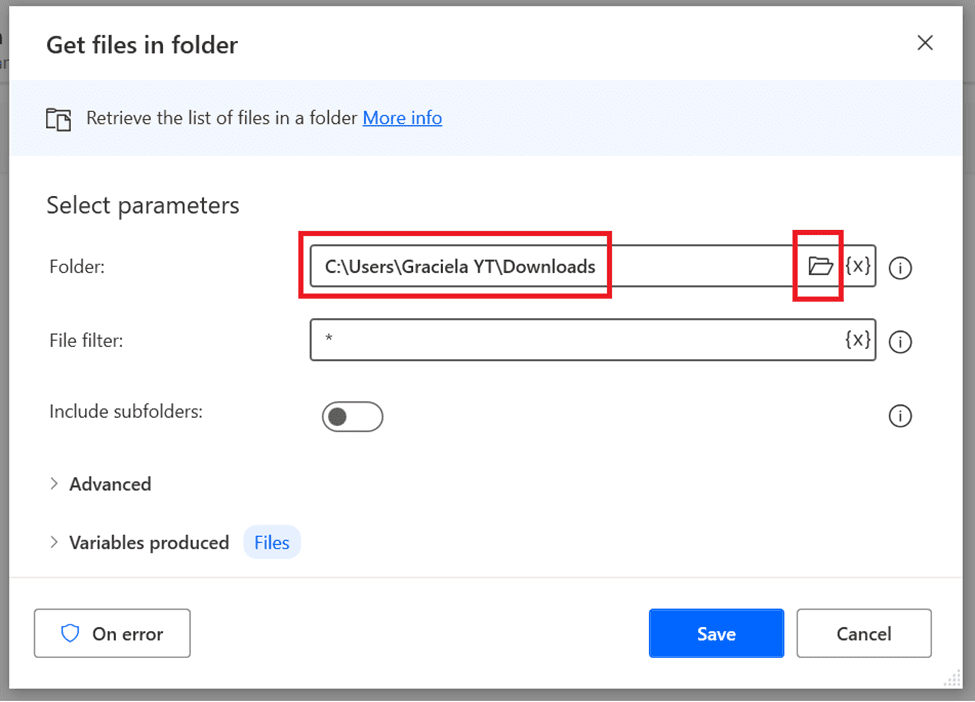
First, make sure to disable the “ask” option and define a default location for your files.
This is your flow right now:
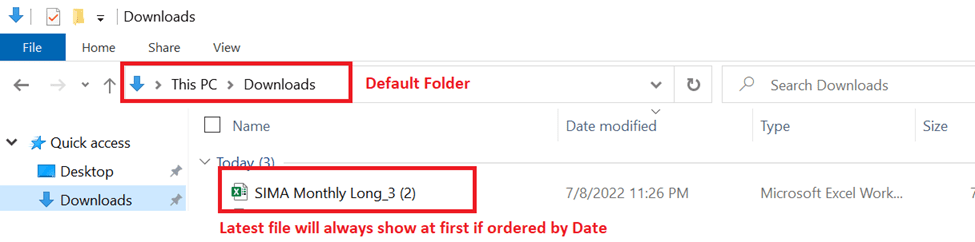
When a file downloads, it will go to the folder you defined in the Browser settings.
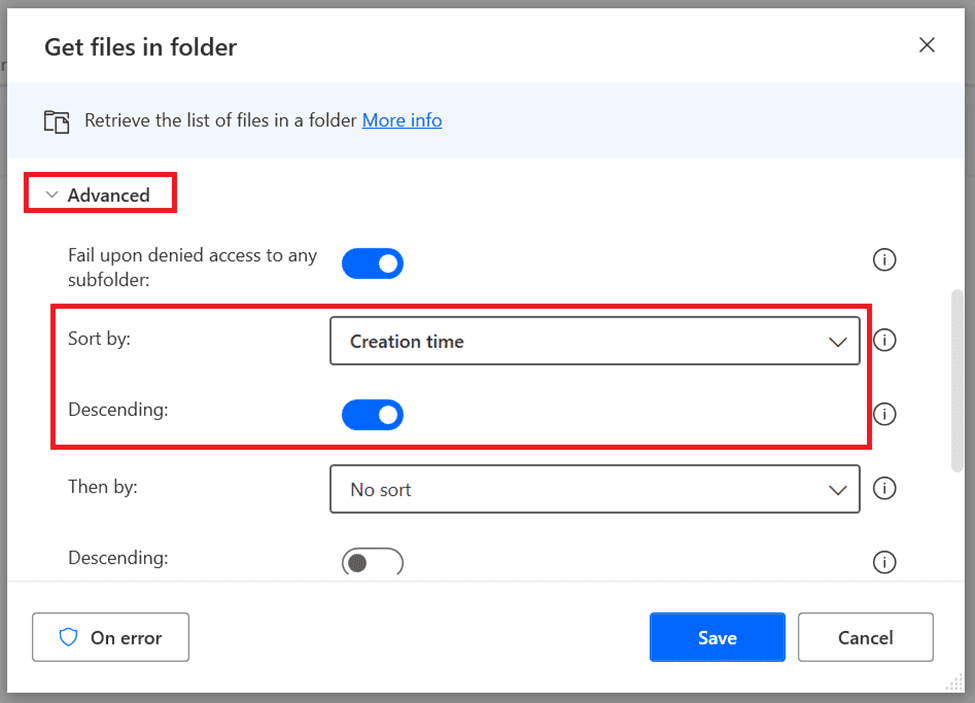
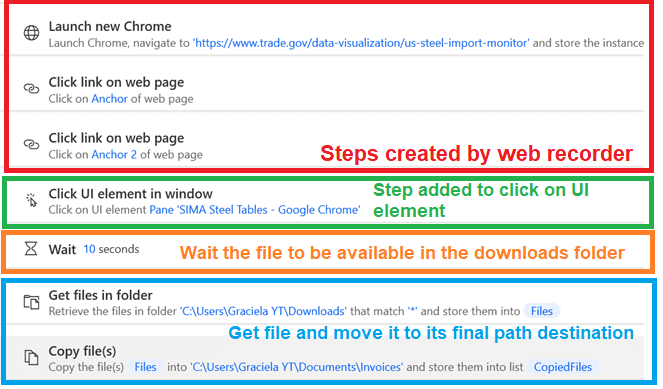
Click on the advanced options and then Select Sort By “Creation Time”, and then Enable Descending. This will make the most recent files to show first.
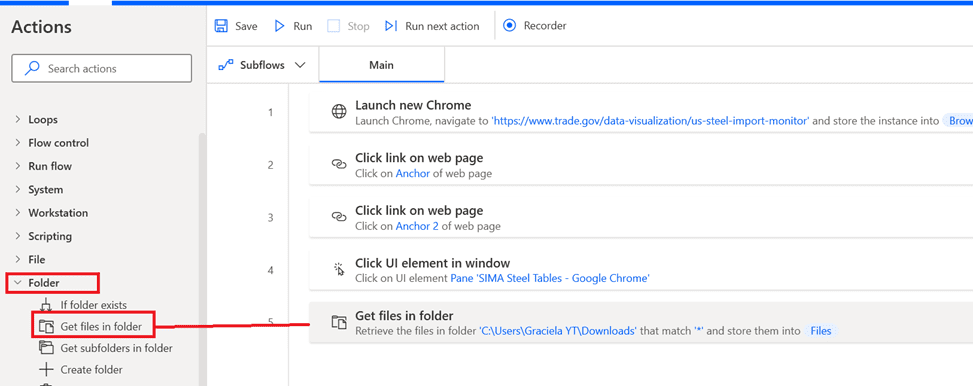
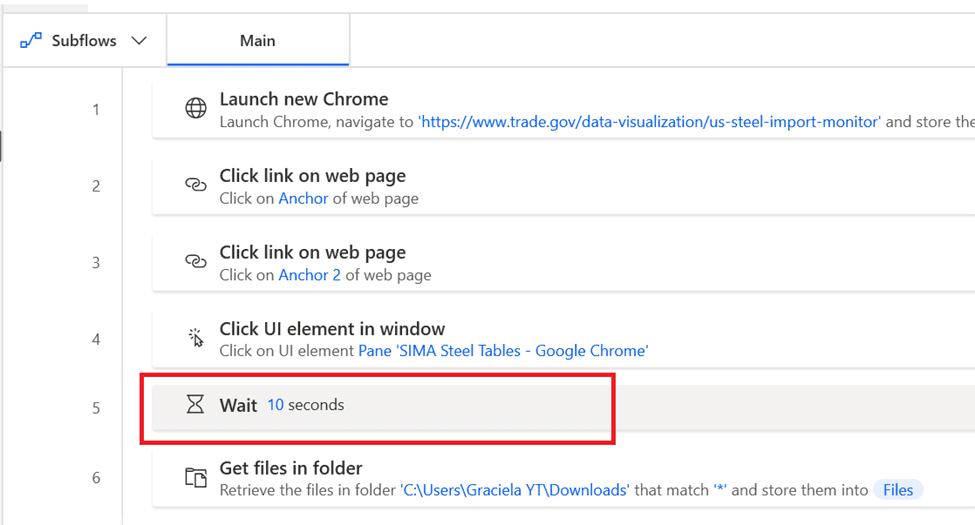
Important: depending how big is your file and how long it may take to fully download, add a small delay before getting the list of files
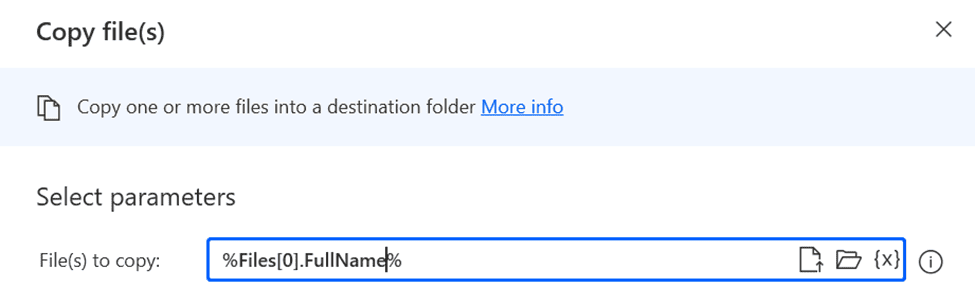
Now that we have the Files list, since we ordered in Ascending mode, it’s going to have the most recent file at the top. So if we access the VERY FIRST file of the list, we’ll be getting the file we just downloaded.
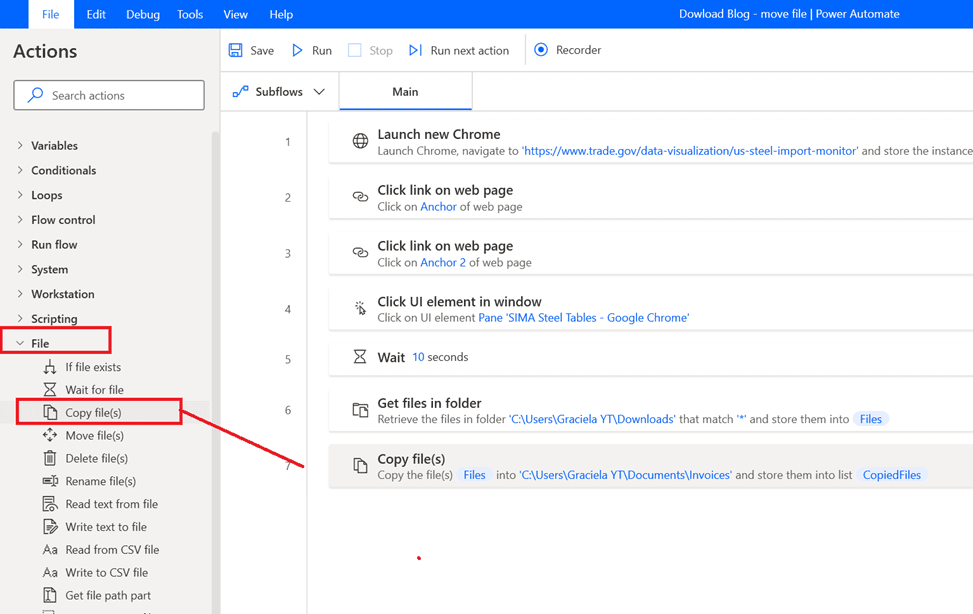
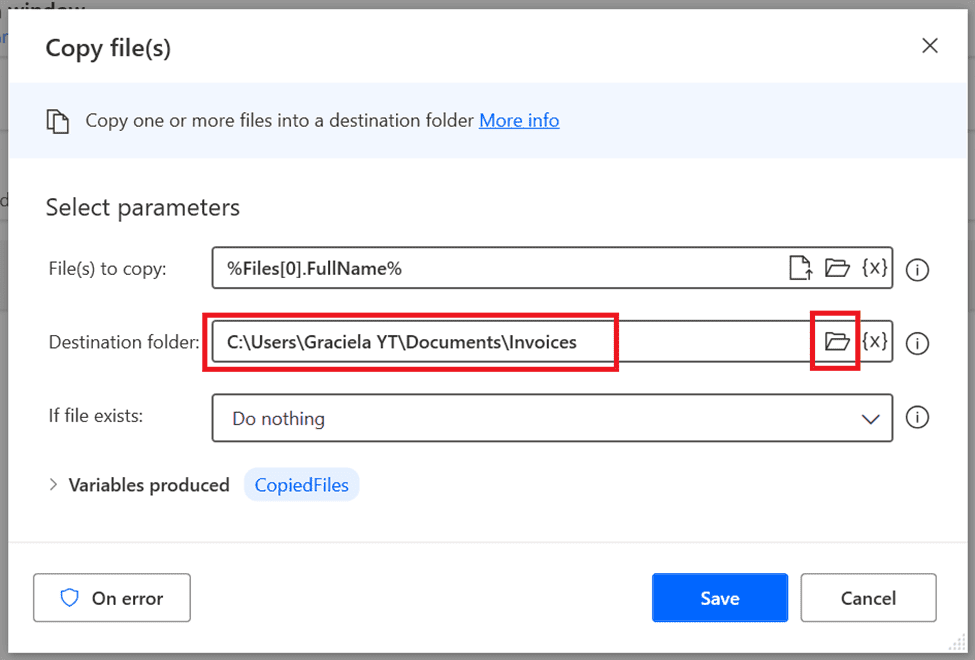
We would need to move this file from its current location (the default downloads folder) to the final destination. We’ll add a copy file action (you can also use a move file action with the same logic).
Note that you can copy of move files, depending on your specific process.
You can use the “Rename File(s)” action from Power Automate to change the name of the file once it’s moved or copied to the final destination.
Final flow should look like this:
All set! You are ready to start downloading files from the web using Power Automate!