private static async Task<string> GetAccessToken()
{
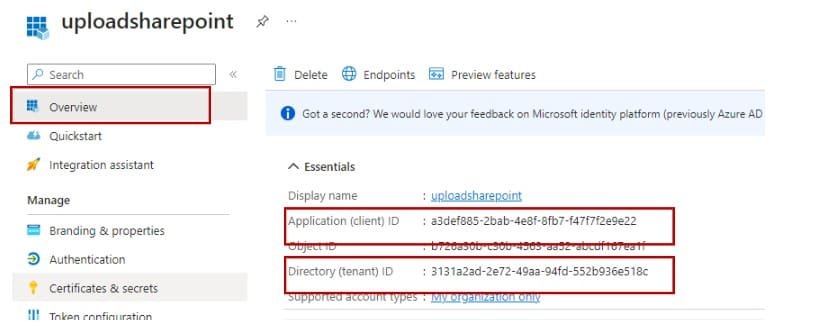
// Azure App registration details
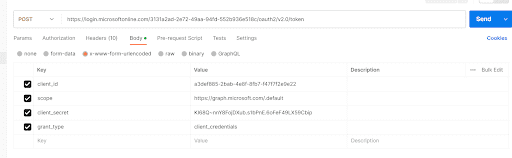
string clientId = "a3def885-2bab-4e8f-8fb7-f47f7f2e9e22";
string clientSecret = "KI68Q~nnY8FojDXub.s1bPnE.6oFeF49LX59Cbip";
// login url - replace 3131a2ad-2e72-49aa-94fd-552b936e518c by your tenant ID
string authority = "https://login.microsoftonline.com/3131a2ad-2e72-49aa-94fd-552b936e518c/oauth2/v2.0/token";
string resource = "https://graph.microsoft.com/.default";
// Get access token
var clientCredentials = new Microsoft.IdentityModel.Clients.ActiveDirectory.ClientCredential(clientId, clientSecret);
var cca = ConfidentialClientApplicationBuilder
.Create(clientId)
.WithClientSecret(clientSecret)
.WithAuthority(new Uri(authority))
.Build();
var result = await cca.AcquireTokenForClient(new[] { resource })
.ExecuteAsync();
return result.AccessToken;
}
We need the following variables in our doe
// Get Query parameters
string url = req.RequestUri.ParseQueryString()["url"];
string fileName = req.RequestUri.ParseQueryString()["fileName"];
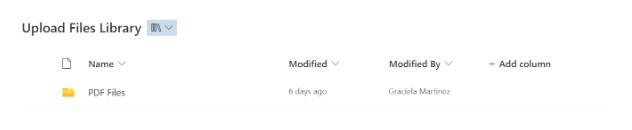
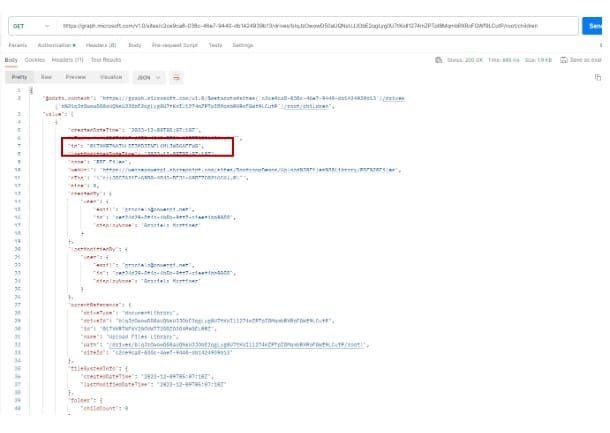
// Site, Drive and Folder files will be uploaded to
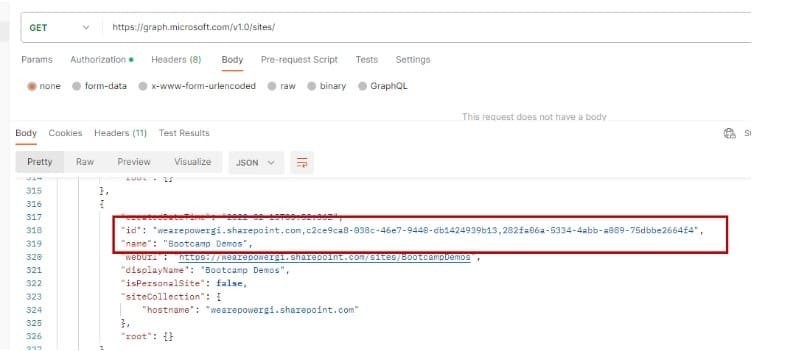
string siteID = "wearepowergi.SharePoint.com,c2ce9ca8-038c-46e7-9440-db1424939b13,282fa06a-5334-4abb-a089-75dbbe2664f4";
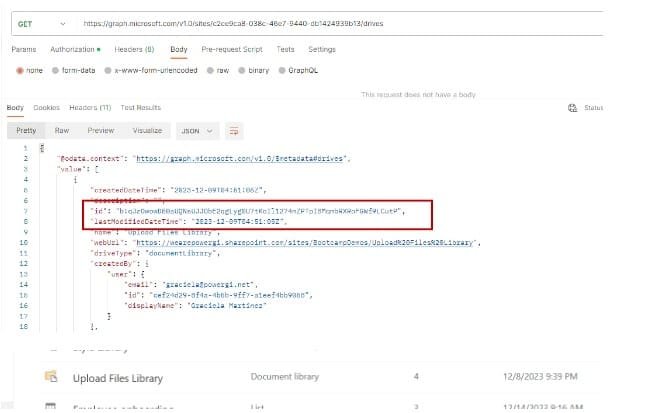
string driveID = "b!qJzOwowD50aUQNsUJJObE2qgLyg0U7tKoIl1274mZPTpI8MqmbRXRoFGWf9LCutP";
string parentID = "017XKR7NA7ULDT3MDJINEL6MLJW56AEFWG";
// variable to get file content
byte[] fileBytes;
Code to extract file content from URL and upload to SharePoint
using (HttpClient client = new HttpClient())
{
try
{
//get file fom URL and assign to variable
client.Timeout = TimeSpan.FromMinutes(3);
fileBytes = await client.GetByteArrayAsync(url);
log.LogInformation($"Downloaded bytes: {fileBytes.Length}");
}
catch (Exception ex)
{
//if any error happens
log.LogError($"Error: {ex.Message}");
log.LogError($"Error: {ex.Data}");
log.LogError($"Error: {ex.Source}");
return new StatusCodeResult((int)HttpStatusCode.InternalServerError);
}
}
// Checks if content is not empty
if (fileBytes == null || fileBytes.Length == 0)
{
log.LogError("File content is empty");
return new BadRequestObjectResult("File content is empry.");
}
// endpoint and SharePoint link
string SharePointUrl = $"https://graph.microsoft.com/v1.0/sites/{siteID}/drives/{driveID}/items/{parentID}:/{fileName}:/content";
//call GetAccessToken to obtain access token
string accessToken = await GetAccessToken();
using (HttpClient client = new HttpClient())
{
//start call to graph API
client.Timeout = TimeSpan.FromMinutes(20);
// Set Authorization header
client.DefaultRequestHeaders.Add("Authorization", $"Bearer {accessToken}");
// Add file content to request body
ByteArrayContent content = new ByteArrayContent(fileBytes);
// set headers
content.Headers.ContentType = new System.Net.Http.Headers.MediaTypeHeaderValue("text/plain");
// call graph API, with all correspondin parameters
HttpResponseMessage response = await client.PutAsync(SharePointUrl, content);
response.EnsureSuccessStatusCode();
}
log.LogInformation("File downloaded and stored in SharePoint");
return new OkObjectResult("File downloaded and stored in SharePoint");
Final code should look like this
using System;
using System.Net;
using System.Net.Http;
using System.Threading.Tasks;
using Microsoft.AspNetCore.Mvc;
using Microsoft.Azure.WebJobs;
using Microsoft.Azure.WebJobs.Extensions.Http;
using Microsoft.Extensions.Logging;
using Microsoft.Identity.Client;
public static class DownloadAndUploadFunction
{
[FunctionName("DownloadAndUploadFunction")]
public static async Task<iactionresult> Run(
[HttpTrigger(AuthorizationLevel.Function, "get", "post", Route = null)]
HttpRequestMessage req,
ILogger log)
{
// Get Query parameters
string url = req.RequestUri.ParseQueryString()["url"];
string fileName = req.RequestUri.ParseQueryString()["fileName"];
// Site, Drive and Folder files will be uploaded to
string siteID = "wearepowergi.SharePoint.com,c2ce9ca8-038c-46e7-9440-db1424939b13,282fa06a-5334-4abb-a089-75dbbe2664f4";
string driveID = "b!qJzOwowD50aUQNsUJJObE2qgLyg0U7tKoIl1274mZPTpI8MqmbRXRoFGWf9LCutP";
string parentID = "017XKR7NA7ULDT3MDJINEL6MLJW56AEFWG";
// variable to get file content
byte[] fileBytes;
using (HttpClient client = new HttpClient())
{
try
{
//get file fom URL and assign to variable
client.Timeout = TimeSpan.FromMinutes(3);
fileBytes = await client.GetByteArrayAsync(url);
log.LogInformation($"Downloaded bytes: {fileBytes.Length}");
}
catch (Exception ex)
{
//if any error happens
log.LogError($"Error: {ex.Message}");
log.LogError($"Error: {ex.Data}");
log.LogError($"Error: {ex.Source}");
return new StatusCodeResult((int)HttpStatusCode.InternalServerError);
}
}
// Checks if content is not empty
if (fileBytes == null || fileBytes.Length == 0)
{
log.LogError("El contenido del archivo es nulo o vacío. No se realizará la carga en SharePoint.");
return new BadRequestObjectResult("El contenido del archivo es nulo o vacío. No se realizará la carga en SharePoint.");
}
// endpoint and SharePoint link
string SharePointUrl = $"https://graph.microsoft.com/v1.0/sites/{siteID}/drives/{driveID}/items/{parentID}:/{fileName}:/content";
//call GetAccessToken to obtain access token
string accessToken = await GetAccessToken();
using (HttpClient client = new HttpClient())
{
//start call to graph API
client.Timeout = TimeSpan.FromMinutes(20);
// Set Authorization header
client.DefaultRequestHeaders.Add("Authorization", $"Bearer {accessToken}");
// Add file content to request body
ByteArrayContent content = new ByteArrayContent(fileBytes);
// set headers
content.Headers.ContentType = new System.Net.Http.Headers.MediaTypeHeaderValue("text/plain");
// call graph API, with all correspondin parameters
HttpResponseMessage response = await client.PutAsync(SharePointUrl, content);
response.EnsureSuccessStatusCode();
}
log.LogInformation("File downloaded and stored in SharePoint");
return new OkObjectResult("File downloaded and stored in SharePoint");
}
private static async Task<string> GetAccessToken()
{
// Azure App registration details
string clientId = "a3def885-2bab-4e8f-8fb7-f47f7f2e9e22";
string clientSecret = "KI68Q~nnY8FojDXub.s1bPnE.6oFeF49LX59Cbip";
// login url - replace 3131a2ad-2e72-49aa-94fd-552b936e518c by yout tenant ID
string authority = "https://login.microsoftonline.com/3131a2ad-2e72-49aa-94fd-552b936e518c/oauth2/v2.0/token";
string resource = "https://graph.microsoft.com/.default";
// Get access token
var clientCredentials = new Microsoft.IdentityModel.Clients.ActiveDirectory.ClientCredential(clientId, clientSecret);
var cca = ConfidentialClientApplicationBuilder
.Create(clientId)
.WithClientSecret(clientSecret)
.WithAuthority(new Uri(authority))
.Build();
var result = await cca.AcquireTokenForClient(new[] { resource })
.ExecuteAsync();
return result.AccessToken;
}
}</string></iactionresult></string>