Table of Contents
In this blog, we will show how to use the SharePoint API along with Power Automate to grant access to specific items in a SharePoint list to a SharePoint security group or to a Security group created in the Azure Portal. This can be used for sharing both files in a SharePoint library or items in a SharePoint list. If you’re looking for expert guidance, our Microsoft Power Platform consulting services can help you streamline your workflows efficiently.
Combining SharePoint API and Power Automate is really useful, mainly when the regular “Grant access to item or file” action can’t be used because the group doesn’t show up in the selection list or when we want this group to be dynamic.
Unlock the full potential of your automated workflows by utilizing our Power Platform consulting services. Our skilled team is ready to streamline your processes efficiently, ensuring you harness the complete capabilities of both Power Automate and SharePoint API to meet your specific needs.
Access Types
First things first, we need to define which type of access will be granted to the group members. The options are:
- View only access
- Edit access
There are two pre-defined IDs that are used to define the access when performing the action from Power Automate. These are standard for all tenants.
If the group will require view only access:1073741826
If the group will require edit access:1073741827
SharePoint Groups
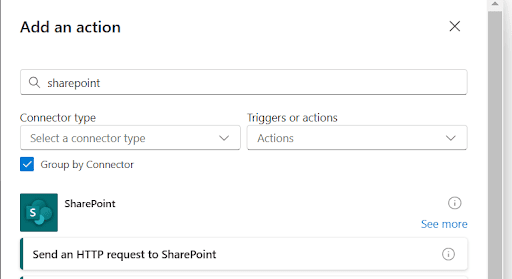
Step 1. Find the SharePoint HTTP action
Search for the “Send and HTTP request to SharePoint” action in Power Automate
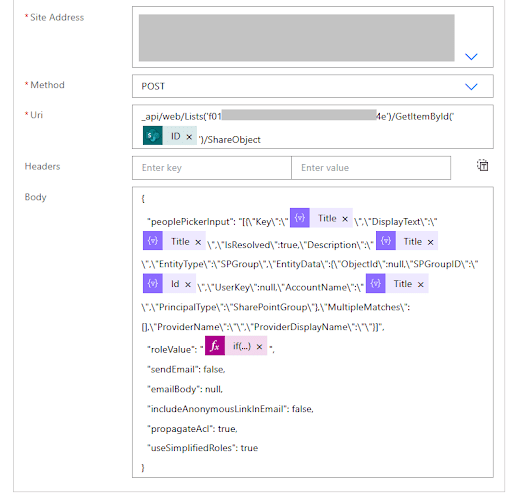
Step 2. Set up the SharePoint HTTP action
Site address: Select the SharePoint site
Method: POST
URI: _api/web/Lists(‘list-guid’)/GetItemById(‘item-id’)/ShareObject
Body:
					{
  "peoplePickerInput": "[{\"Key\":\"{group-name}\",\"DisplayText\":\"{group-name}\",\"IsResolved\":true,\"Description\":\"{group-name}\",\"EntityType\":\"SPGroup\",\"EntityData\":{\"ObjectId\":null,\"SPGroupID\":\"{group-id}\",\"UserKey\":null,\"AccountName\":\"{group-name}\",\"PrincipalType\":\"SharePointGroup\"},\"MultipleMatches\":[],\"ProviderName\":\"\",\"ProviderDisplayName\":\"\"}]",
  "roleValue": "role:{role-type-id}",
  "sendEmail": false,
  "emailBody": null,
  "includeAnonymousLinkInEmail": false,
  "propagateAcl": true,
  "useSimplifiedRoles": true
}
Final set up should be like this:
Security Groups (Microsoft Entra Groups)
Step 1. Find the SharePoint HTTP action
Search for the “Send and HTTP request to SharePoint” action in Power Automate

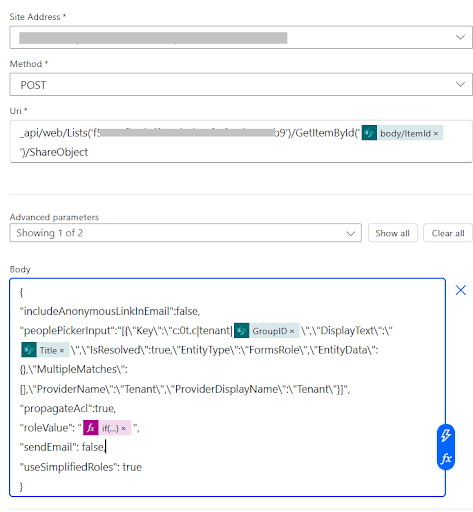
Step 2. Set up the SharePoint HTTP action
					{
"includeAnonymousLinkInEmail":false,
"peoplePickerInput":"[{\"Key\":\"c:0t.c|tenant|{group-id}\",\"DisplayText\":\"{group-name}\",\"IsResolved\":true,\"EntityType\":\"FormsRole\",\"EntityData\":{},\"MultipleMatches\":[],\"ProviderName\":\"Tenant\",\"ProviderDisplayName\":\"Tenant\"}]",
"propagateAcl":true,
"roleValue": "role:{role-type-id}",
"sendEmail": false,
"useSimplifiedRoles": true
}
Final set up should be like this:
Conclusion
You can leverage SharePoint API and Power Automate’s SharePoint connector to share items with specific security groups created in the Azure portal or SharePoint groups that may need access to these items in our SharePoint lists.
Contact us if you have any questions or if you want to know how we can help you implement these row-level security features for your Power Automate workflows!