Table of Contents
What is Power Apps and how does app development work?
Power Apps is Microsoft’s tool for developing custom business applications development in the Power Plaftorm.
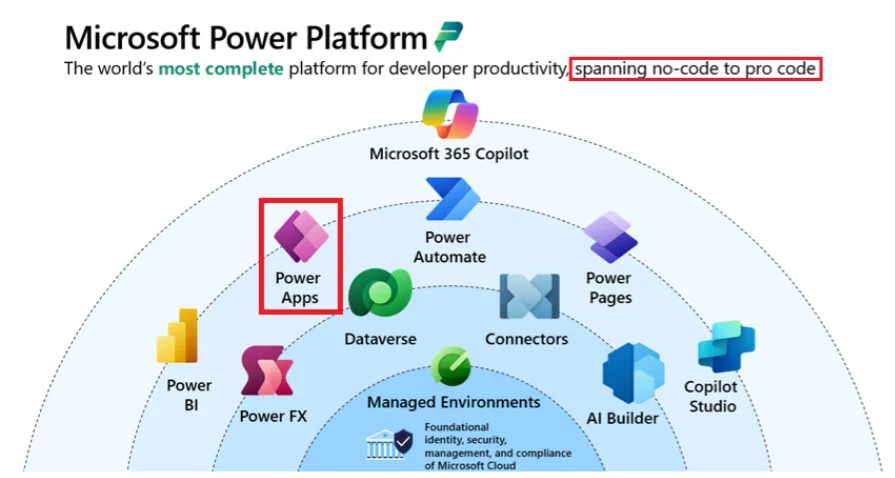
Back when Power Apps started, it started being a purely low-code platform, where both business users and pro-developers could create business apps. Nowadays, the platform has evolved, and there are different types of applications that can be developed:
- Canvas Apps
- Model-driven Apps
- Code Apps
- Vibe Apps
To learn more about all the Power Apps application types, head to our blog on this topic.
For this blog, we will focus on Canvas Apps. However, some of the tips shared here apply to any kind of Power Apps that is being built.
With Canvas Apps, we start with a data source, then define the app’s logic using Power Fx (Power Apps’ formula language, inspired by Excel), design your screens, and then publish and share the app with your organization. We will discuss some good practices to follow when following this approach.
Step-by-step: how to create a canvas app in Power Apps
Step 1. Diagnose the process
A few hours of structured diagnosis when you start will save you weeks of rework later. It’s always key to start every project by analyzing the current state of the process and identifying volume, impacted teams and user roles.
Some ideas of questions to ask are:
- How many records will this app handle per day, per month, over its lifetime?
- Where does data come from? Is it entered manually, pulled from an existing system, scanned from a document?
- Where does the data entered go? Does it need to be delivered to someone? Is a report or dashboard needed? Do records need to be transferred to another system?
- How many users will submit data?
- How many records exist today?
- Will existing data be migrated?
- What’s the expected growth over the next 12–24 months?
- Which teams and users will touch and impact the process and app? For example, users can be grouped by what they need to do in the app:
- Data entry users: Submit or log information
- Reviewers / Approvers: View, validate, or act on submissions
- Managers / Supervisors: Monitor status, view dashboards, generate reports
- Admins: Configure the app, manage catalogs, handle exceptions
- Can everyone see everything? Can users in the same team or department see everything others in their same group created? Can users only see what they have created? Are there records that should be read-only once approved?
- Which kind of Microsoft 365 license do current users have? Does everyone have a license currently?
- Is there a budget for monthly licensing? If yes, will the company pay for active users each month or just pay for every users? If not, is SharePoint a good option for the application based on volume?
Step 2. Create a “to-be” process and Prototype the solution
Once we understand the current state, it’s time to start thinking how to use the Power Platform and Power Apps, to start with we need the following two points:
- A clear picture of how the process should work once the app exists (this will tell us what to build).
- A visual representation that makes the vision tangible enough for real users to also visualize the end solution (this will tell us if we’re building the right thing)
When working with Power Apps, it’s not just a matter of digitalizing a form, it’s an opportunity to eliminate unnecessary steps, reduce manual handoffs and enforce consistency. At Power [GI] we love using Lucidchart as our mapping tool, but other tools such as Miro, Visio or even a Power Point or Excel flowchart could work well here. The new “to-be” process should be validated with the process owner before moving on.
Once the to-be process is agreed upon, it’s time to materialize the vision into a mockup with screens, buttons, forms and lists and everything in between. For each key screen, include the fields and controls present, the primary actions available, any role-based differences in what’s visible, and how the user moves through the different steps or stages. Not all screens need to be prototyped at once, the ones with more complexity or impact can be prioritized:
- Submission forms
- Browse/List view
- Approval or review screens
There are different tools that can be used for this step: Figma, Lucidchart, Miro or even Power Point slides. Make sure the prototype is validated with the users that will interact with the app daily.
Step 3. Create the data model
With the to-be process validated and the prototype approved, now we know which data the application needs to capture and display. It’s time to put this into a data model.
List every distinct entity in the process (Projects, Employees, Departments, Approvers), each of these will be a table. And for each table, define its fields or attributes that it needs to have (project name, start date, status, project leader, etc) and the data type (text, date, number). Finally, define the relationships between tables. For example, if for each project we need to define a project leader from the employee list, these two tables need to be related.
Step 4. Define a data source
Choosing the right data source is one of the most important decisions in a Power Apps project, it affects:
- Licensing budget
- Performance
- Scalability
- Security
- How much you can do with the app long-term
The data source decision comes down to the questions asked in point #1, where we analyzed the current state of the process, so make sure to not skip this first step!
For a lot of Power Apps projects, the choice usually comes down to three data sources:
- SharePoint lists. This is the most accessible starting point for a lot of companies because it can be used from Power Apps at no additional licensing cost beyond the existing Microsoft 365 subscription. SharePoint works well for simple, low-volume apps with straightforward data structures (holiday requests, task trackers, small inventories). However, SharePoint comes with real limitations: SharePoint lists are not a database so real relationships between tables are not a thing when working with this data source and there are also delegation limits to some operations and there can be performance issues if the lists are not configured correctly.
- Microsoft Dataverse. This is the recommended choice for anything that needs to scale, and it’s also the recommended option from a Microsoft perspective. Dataverse is actually part of the Power Platform ecosystem and it has a lot of out-of-the-box features that facilitate the development process in Power Platform.
Dataverse is a relational database built into the Power Platform, with native support for table relationships, business rules, calculated columns, role-based security at the row and column level. Dataverse requires premium license (meaning that companies have to pay a license for each user that will interact with the app). - SQL Server (on the cloud or on-premises). This is a good option if the company already has a SQL Server instance running for other processes, or if data already lives in SQL Server or if there is a technical team that can support server set up, maintenance and such tasks. SQL Server usually scales well in Power Platform and it integrates cleanly with Power Apps via a Premium connector and is particularly well suited for apps that sit alongside existing enterprise systems. Just like Dataverse, it requires each user to have a Premim license.
Step 5. Select an environment for your automation
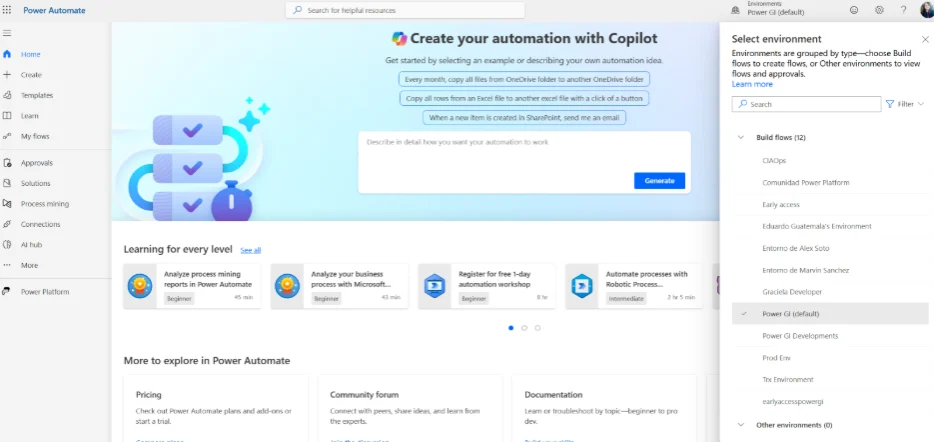
Before building the application, you need to choose the right environment. An environment in Power Apps is a container that holds apps, data and connections separate from other spaces.
For apps and forms that are related to key processes, it’s always important to have dedicated environments for development, testing, and production.
Step 6. Create a solution
Once you’re in the right environment, the next step is to create a solution before building anything in Power Apps.
A solution is a box inside a container (the container is the environment) that groups apps, connections, tables and workflows as a single package. Solutions and environments are the base for good development practices because they allow to move solutions between Development, Testing and Production environments.
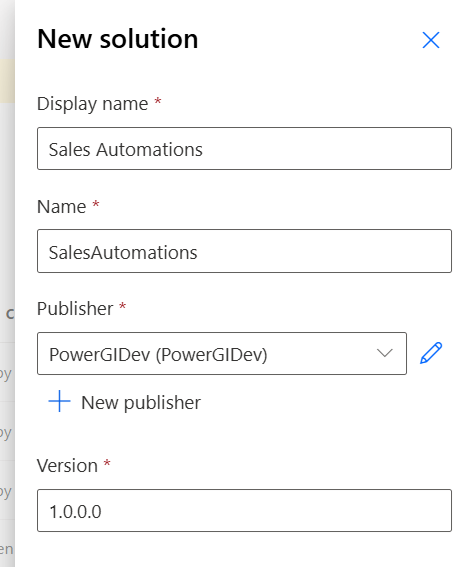
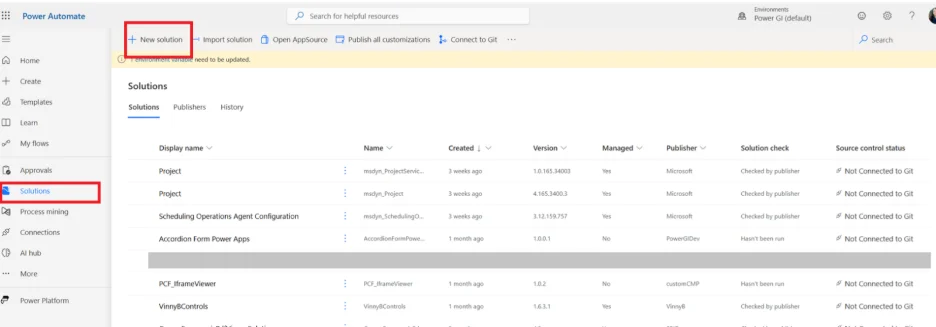
Creating a solution is straightforward: Go to Power Automate portal in https://make.powerautomate.com/ and locate the Solutions in the left sidebar, click New solution, give it a descriptive name, and assign it a publisher.
Step 7. Create the app
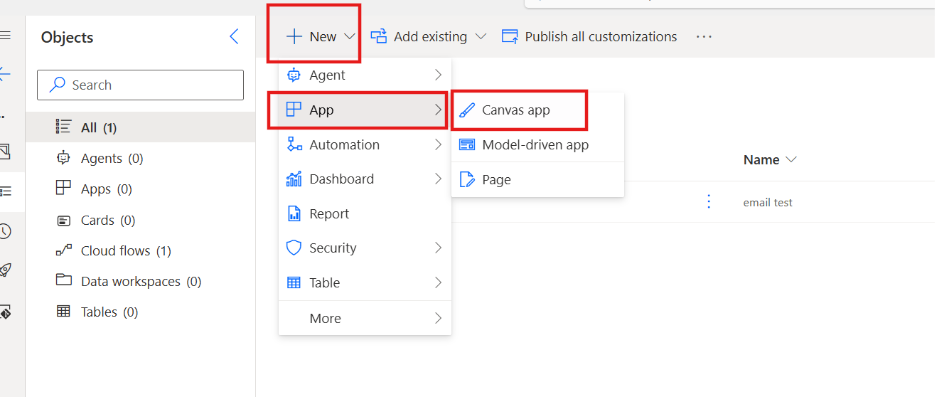
With the solution open, click New and select App > Canvas App. This creates the application directly inside the solution.
Once created, the platform will take you to the Power Apps editing studio:
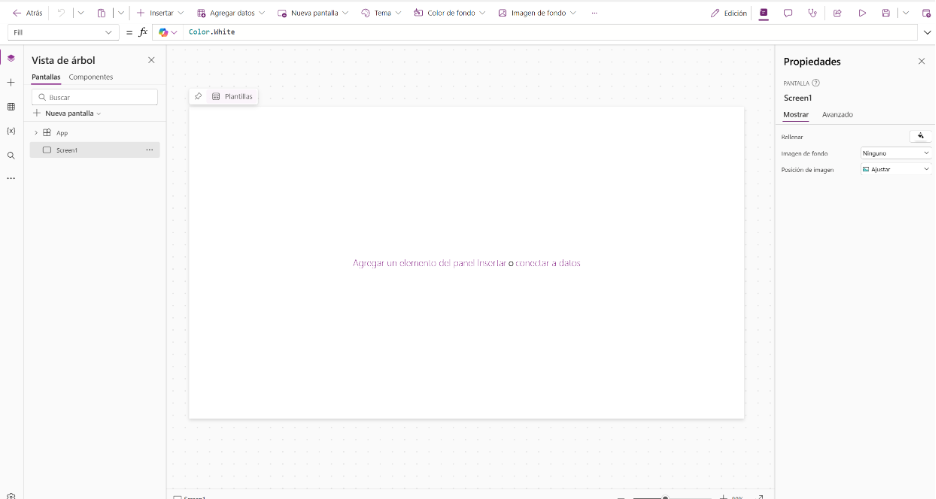
From here, we can start connecting data (SharePoint, Dataverse, SQL Server) and adding screens, containers, buttons, lists, forms and everything needed to build the application.

Recommended practices when developing apps in Power Apps
The recommendations listed in this section combine Microsoft’s official development guidelines with practical approaches our team of developers has refined through hands-on experience building and maintaining Power Apps solutions across real client environments.
- Never skip the diagnosis, mapping and prototyping steps! We cannot stress this one enough, it’s key to always start all Power Apps project by analyzing the current state of things.
- Select the correct environment for each application and always consider the different the development stages (dev, QA, prod), always apply Application Life Cycle principles to all your projects (learn more here).
- Always build inside a solution, if something is created outside a solution, make sure to always add the app to its corresponding solution!
- Use components for reusable UI. Components are reusable blocks of code, logic and controls. If your header, navigation menu, or custom input control appears on more than one screen, it‘s better built it as a component. Changes made to the component propagate everywhere it’s used, which is great for long-term maintenance and support.
Learn about components in one of our recent videos where we shared how to create collapsible forms in Power Apps.
- Name everything (screens, components, controls, vaiables and formulas) consistently.
The default names Power Apps generates are not great (Label1, Button3, Gallery2_1). Make sure to adopt a naming convention from day one. Some ideas on how to rename:
Element | Convention |
Screen | scrScreenName |
Component | cmpComponentName |
Global Variable | varVariableName |
Formula | fxFormulaName |
Scope/Context Variable | ctxVariableName |
Gallery | galListName |
Label | lblFieldName |
Button | btnActionName |
Text input | txtFieldName |
- Make sure all your operations support delegation. When a formula or operation is delegable, Power Apps is not the one who executes the operation, what Power Apps does it to delegate the operation to the data source for it to process it server-side and returns only relevant results. Always check for yellow delegation warnings in the formula bar. Prefer delegable functions (Filter, Sort, Search with supported connectors) and keep in mind the limits for each function and each datasource.
- Use variables and formulas wisely. Power Apps has two variable types: Global variables (Set()) available across the entire app, and Context variables (UpdateContext()) scoped to a single screen. Formulas are values that do not change while the app session is open and functions that can be used in the entire app
- Get into the habit of commenting your logic from day one. In Power Fx, single-line comments use // and block comments use /* */. Some examples:
// Navigate to the detail screen only if a record is selected
If(
!IsBlank(galProjects.Selected.ID),
Navigate(scrProjectDetail, ScreenTransition.Fade),
Notify("Please select a project first.", NotificationType.Warning)
)
Common mistakes to avoid when building Power Apps
We have discussed some good practices to implement when working from Power Apps, now let’s go over some common mistakes to keep away from!
- Using a personal account as the application owner. It may be convenient to just start building from your own account, but this can get tricky over time. Always start any Power Platform project creating a service account or a dedicated automations account and use this account as the owner of the app and the authenticated identity behind all connectors.
- Not considering the Power App user quota limit per minute. There is a limit on the number of concurrent users and the number of operations that each user can execute per minute. If for example, a user will execute an import operation from the app with hundreds or thousands of rows, this operation can be throttled or can error out from the app if not configured correctly (see next point!).
- Executing all operations from the application. Power Apps is a presentation layer and forgetting this can lead to slow apps. Always keep in mind that heavy operations belong in the backend. Some operations can be delegated to a layer that can run independently, handle retries, and log failures properly (such as triggers, stored procedures, or a Power Automate workflow).
- Not testing the app with proper data volume levels. 50 test records are not the same as real production data. Always design with production volumes in mind.
How to optimize Power Apps for long-term success
Some thoughts to consider to build apps that work and scale in long-term
- Never skip a proper diagnosis of the process before building. What causes re-work or extended hours of maintenance is sometimes not what’s in the buttons or controls, it’s the lack of clarity before building the app. Spending some time in the discovery process at the start is always a good idea!
- Apply proper data normalization and database concepts, regardless of your data source. As we always say, great apps can only happen with great data models! Good database design is not just for SQL developers, it applies to every application: store each piece of information once, in one place, and reference it everywhere else. Make sure to also create index columns and connect tables properly to optimize performance.
- Monitor performance with the monitor tool. Always test the app in “play” mode and monitor all logs. Identify slow queries, excessive data loads, and redundant calls.
- Select a proper data source (use Dataverse for scaling). Always consider the production data volumes when selecting a data source and always configure your data sources in a way they can scale (see point #2 for database concepts!).
- Document the app. This is key: your future you will thank you for documenting the app, make sure to include: the app’s purpose, data sources used, key formulas and their logic, known limitations.
Build scalable apps with Power [GI]
At Power[GI] we approach Power Apps projects the right way: from process diagnosis and data modeling to development, deployment, and governance. We build solutions designed to scale with your business. Learn about our Power Apps services or contact us today.