Table of Contents
How to create a Power Automate flow with best practices
Process automation used to be something only developers could build with fancy code tools. Today, with low-code tools like Power Automate, automation is now accessible to both pro developers and citizen developers (business users), but just because building automations is easier doesn’t mean good practices matter less.
Building with intent and understanding best practices is a key part of a sustainable automation strategy in the long term. In this blog, we will share some ideas on how to create a Power Automate flow with best practices.
What is a Power Automate flow and how it works
Power Automate is the Power Platform tool for process automation that allows users to create workflows that connect different applications inside and outside the Microsoft ecosystem. Power Automate works by connecting a trigger (an event that starts the flow) to one or more actions (what happens after the event starts).
For example: when a client signs a contract in DocuSign or Adobe Sign (the event that triggers the flow), create the client code in the accounting system and fill out templates in SharePoint (actions that should happen when the workflow runs).
Learn more about Power Automate as a tool in our blog on this topic, here. To understand Power Automate benefits, check out our article about it.
Step-by-Step: create a Power Automate flow
Step 1. Plan before you automate
It’s always important to start by understanding what you want to achieve with an automation project to find potential improvements, bottlenecks or things you could be doing differently. Automating doesn’t mean taking a process as is and putting into a tool, it includes diagnosing the current status and creating a better “to-be” process.
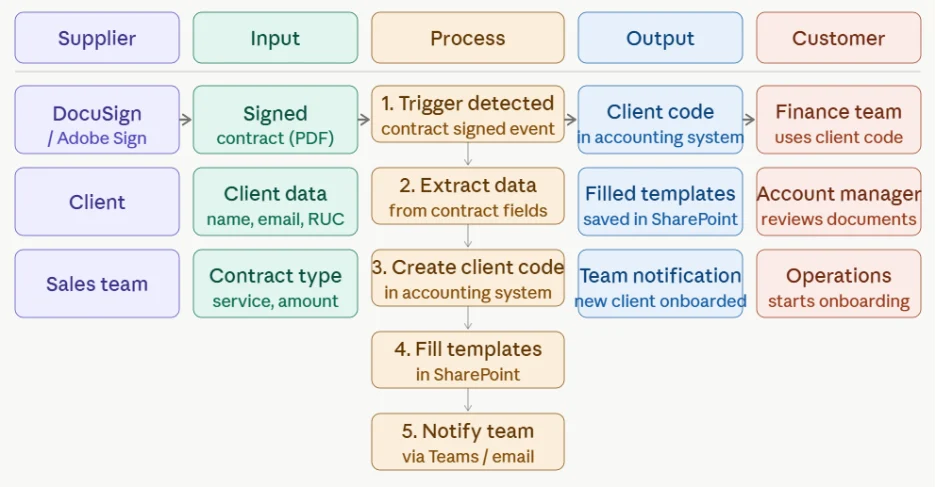
There are many ways to diagnose and map processes, we are fans of the SIPOC diagram, it helps you think through the full scope of a process before building anything. SIPOC stands for Suppliers, Inputs, Process, Outputs, and Customers.
Following the example from the previous section, here is a simplified version of a SIPOC diagram that can be used as reference for this automation:
Step 2. Select an environment for your automation
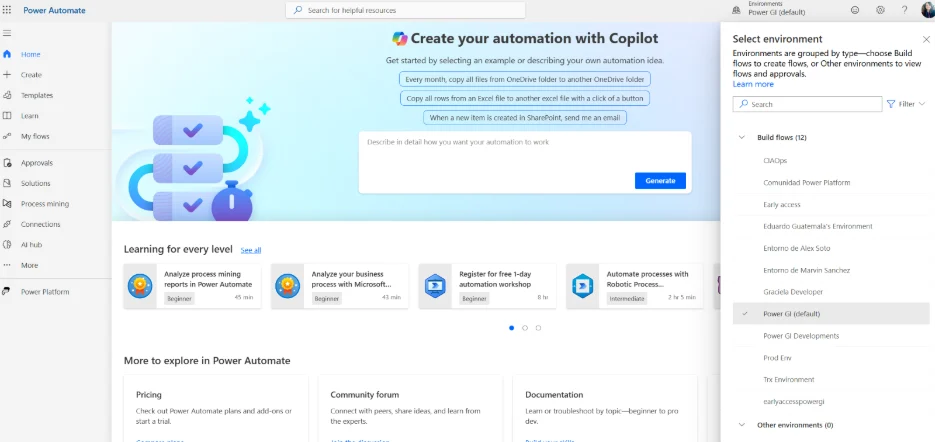
Before building your flow, you need to choose the right environment. An environment in Power Automate is essentially a container that holds flows and connections separate from other environments.
By default, Power Automate drops you into the Default environment, which is shared across your entire tenant. This environment works well for personal productivity automations (a quick flow to save your email attachments or remind you of a meeting), but it’s not the right place for anything that touches business-critical processes or sensitive data. For more serious or important automation projects, it’s always important to have dedicated environments for development, testing, and production.
For example, the organization can have one environment for all Sales team automations, so for this specific use case we’re using as example, selecting this environment would be a good fit.
Step 3. Create a solution
Once you’re in the right environment, the next step is to create a solution before building anything.
A solution is a box inside a container (the container is the environment) that groups flows or apps as a single package. Everything built inside a solution is portable, meaning it can be moved from one environment and imported into another, which is what makes the dev → test → production cycle possible.
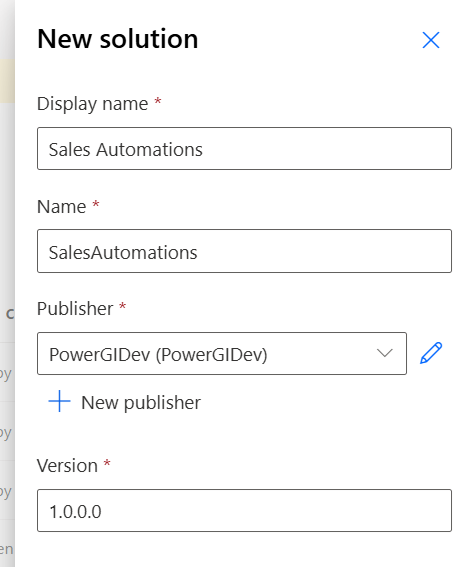
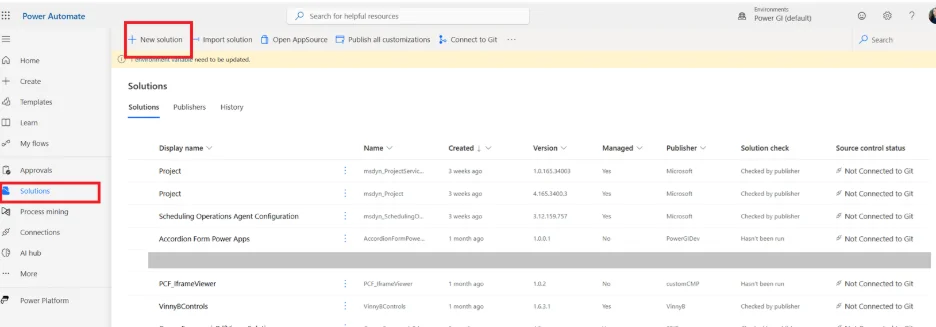
Creating a solution is straightforward: Go to Power Automate portal in https://make.powerautomate.com/ and locate the Solutions in the left sidebar, click New solution, give it a descriptive name, and assign it a publisher.
Step 4. Select a flow type and a trigger
The trigger is the event that starts your flow — the flow will run only if this condition is met. The type of trigger depends on the flow type.
There are three main types of flows:
- Automated flows run automatically when a specific event occurs. For example, a new email, a contract signed, a new row in Excel, a form submission, a file upload.
- Instant flows are triggered manually, either from the Power Automate app, a button in Teams, or a mobile device. Very useful for tasks you want to run on demand.
- Scheduled flows run at a defined time, for example every morning at 8 AM, every Monday, the first of each month. Great for reports, reminders, and data syncs.
Once we know the trigger type and flow type we will use, we can go ahead and create the workflow.
Step 5. Create a new workflow and add to solution
With your solution open, click New and select Automation > Cloud flow > Automated/Scheduled/Instant (select the flow type fits the process). This creates the flow directly inside the solution.
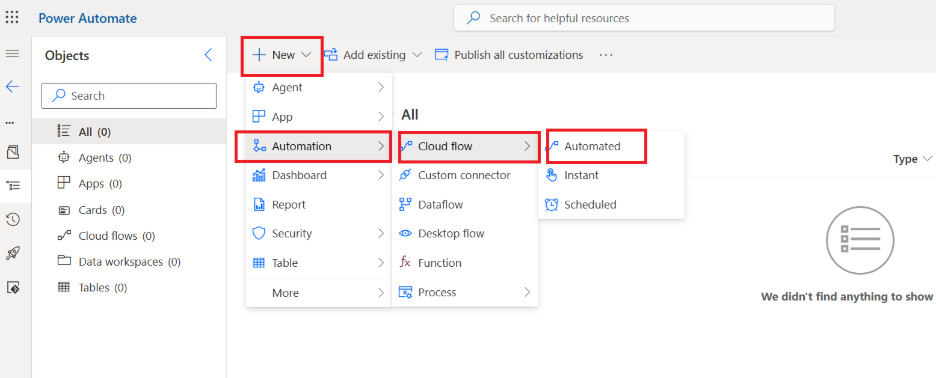
After selecting the flow type, you will be prompted with the trigger type:
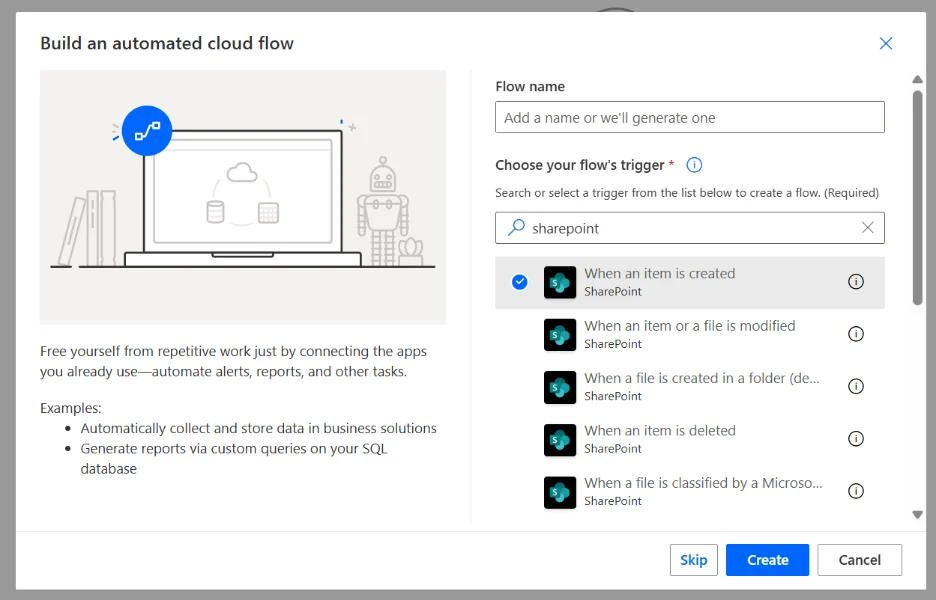
For this example we will use “When an item is created” in SharePoint. This means that when a new row is added in a SharePoint list, we can perform N actions from Power Automate
Step 6. Add actions
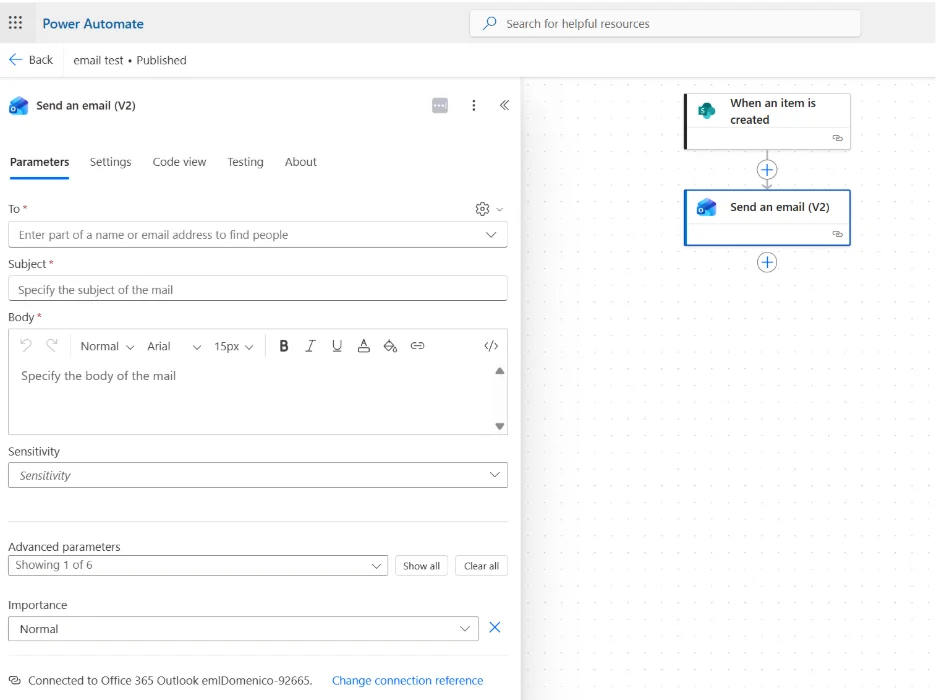
Actions are what define what happens after the trigger fires. In this case, we will send an email
Search for “Send an email” and choose Send an email (V2) from the Office 365 Outlook connector. Fill in the fields:
- To: the recipient’s email address
- Subject: use dynamic content (the lightning bolt icon) to pull in the item’s title — for example: New item added: [Title]
- Body: add relevant details from the SharePoint item using dynamic content fields
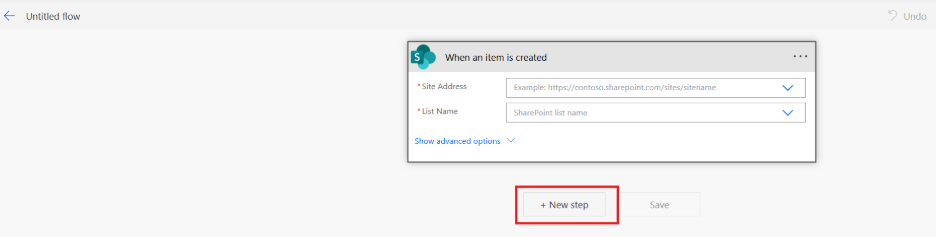
When creating workflows from inside a solution (like we have done in this tutorial), the classic designer UI shows up. To see the new designer open the workflow from “My flows” or from the details tab in the solution.
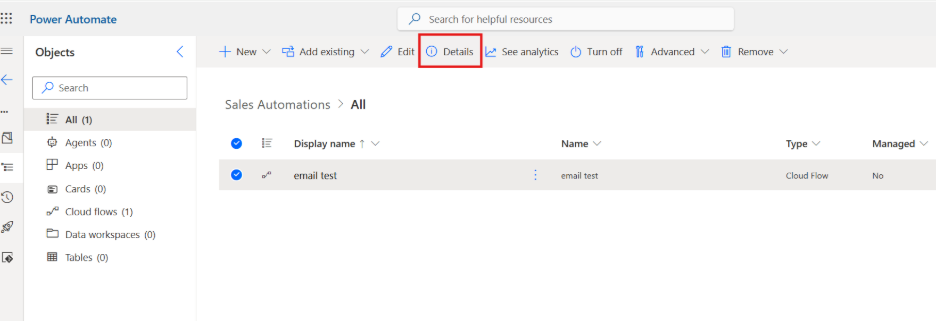
Step 7. Test the flow
Click Test in the top right corner and add a new row in the SharePoint list

Watch the run history update in real time. Green checkmarks mean each step passed. If something fails, click on the failed step to see the exact input/output and error message.

Recommended practices when creating flows in Power Automate
The following recommendations are a combination of Microsoft’s official coding guidelines and practices the our team has refined through hands-on experience building and maintaining flows across real client environments.
- Analyze and diagnose your current process before building anything: understand inputs, outputs, bottlenecks, and improvement opportunities first (use the SIPOC diagram to understand the full scope of the process!).
- Select the correct environment for each workflow: think about the development stage (dev, QA, prod), about the data, and about the process that is being automated.
- Always build inside a solution, if something is created outside a solution, make sure to always add the flow to its corresponding solution!
- Use consistent naming conventions for flows, actions, variables, and connectors
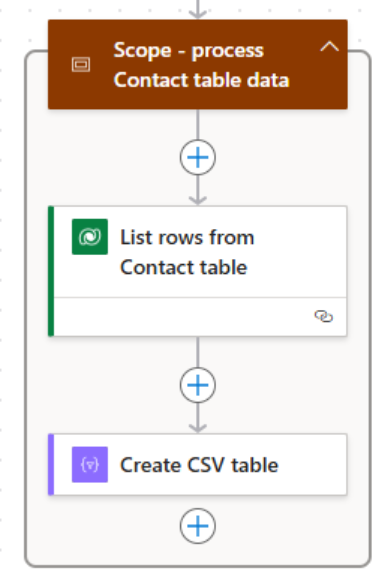
- Structure your flows for readability: use scopes to group related actions and add descriptions to complex steps.
- Make the most of environment variables or configuration tables to avoid hardcoded values
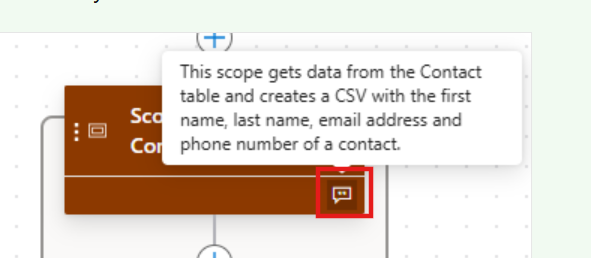
- Add notes or comments to all your actions
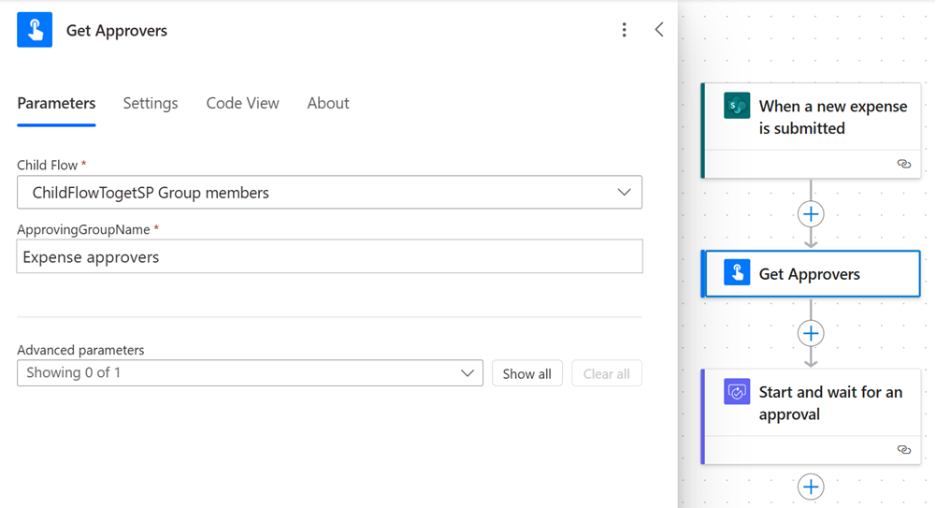
- Create reusable code with child flows or use child flows to break complex logic into reusable, maintainable pieces.
- Use variables for dynamic data that changes throughout the flow; use Compose for static or one-time calculations
- Leverage data operations (Filter Array, Select, Parse JSON, Compose) instead of building unnecessary loops or complex expressions.
- Consider the Power Platform daily quota. Some platform and API limits depend on your license plan. In Power Automate, the easiest way to identify your licenses and capabilities is to select Settings > View My Licenses.
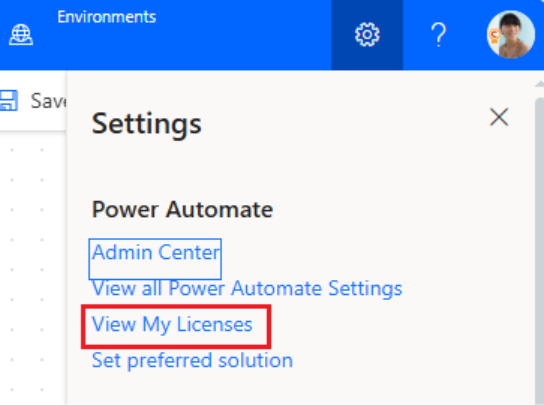
- Consider the data limits of every data source your flow is using; what works at 10 records may break at 10,000. For example, when using SharePoint as data source, if you are filtering or sorting data, make sure to add these columns ad Index columns.
- Add error handling to your workflows: configure “run after” settings and make sure failures surface visibly. In the following example, the flow sends an email notification if it fails at the step Update a row:
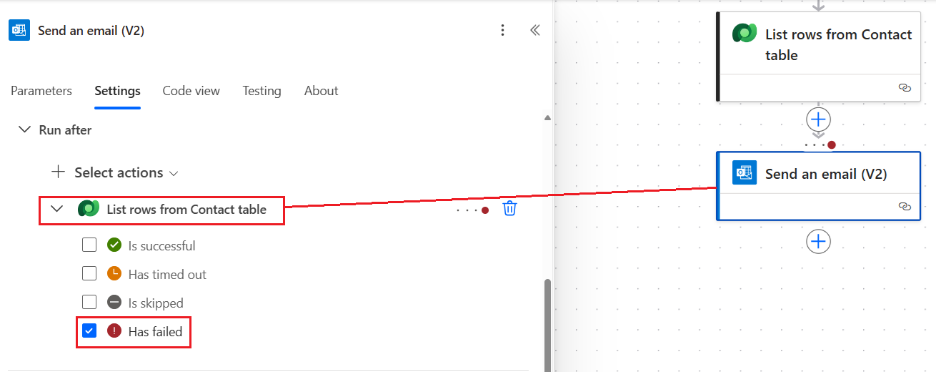
- Apply ALM (application life management) principles when working with Power Automate. Move flows through dev > test > production, never build directly in production. You can learn more about ALM in Power Platform and Power Apps here.

Common mistakes to avoid when building flows
Building a flow is the easy part, but building one that keeps working reliably six months from now is where many users run into trouble. These are the mistakes we see most often, and the ones that are easiest to avoid when you know what to look for.
- Using a personal account as the connection owner. If the person who built the flow or authenticated a connection leaves the organization or changes their password, every flow using this connection will break. Always build production flows with a dedicated service account.
- Not considering the Power Platform daily quota limit. Every license tier in Power Platform comes with a daily limit on flow runs and API calls. Ignoring these limits when designing high-volume automations leads to flows that work fine during testing and silently fail in production once real-world volume kicks in. Know your limits before you architect the solution.
- Using Power Automate as an ETL tool. Power Automate is built for event-driven automation, not bulk data processing. Using it to move, transform, or sync large volumes of data between systems puts unnecessary stress on the connectors and daily usage. For data transformation at scale, dedicated tools like Azure Data Factory, Microsoft Fabric or Dataverse Dataflows are the right choice.
- Unnecessary looping. Applying a loop to every item in a list when the same result could be achieved with a single data operation is one of the most common performance mistakes. Make the most of the PowerFx functions and Data operation actions (such as compose or Select) to avoid unnecessary actions.
- Not accounting for API throttling limits. Every connector has request limits (for example, SharePoint, Outlook, and Teams all throttle calls after a certain volume). If your flow processes hundreds or thousands of items at once, you’ll hit limits and get failures or delays while the connector retries the action.
How to optimize Power Automate flows for long-term use
Some ideas to implement to make your Power Automate workflows run in the long-term are:
- Don’t automate first, diagnose and design a better process. A flow built on a flawed process just makes the flaw run faster. Before going to Power Automate, map your current state, identify the bottlenecks and inefficiencies, and design the “to-be” process you actually want.
- Use solutions and environment separation for all production flows. We can’t say it enough times. Always think about the Dev-Test-Prod separation and put all your automations into solutions to package the related flows together.
- Use child flows for reusability and maintainability. When the same logic appears in more than one flow, its better built as part of a child flow. Breaking complex processes into smaller, reusable pieces makes each part easier to test, easier to update, and easier for someone else to understand.
- Monitor with the Admin Center. The Power Platform Admin Center gives you visibility across your entire tenant: run success rates, failure trends, connector usage, and license consumption.
- Invest in governance. As your automation library grows, governance is what keeps it from becoming unmanageable. Every flow should have a named owner, a defined purpose, and a home inside a solution. Establish naming conventions, document your flows in a shared registry, and define a clear process for reviewing, approving, and retiring automations. Governance isn’t bureaucracy — it’s what makes automation a sustainable capability rather than a collection of things nobody wants to touch.
Build smarter flows with Power [GI]
At Power[GI] we help our clients design, build, and govern Power Automate flows that actually last and work in the long run. From mapping the process to deploying the automation that will transform the way you work. Learn about our Power Automate services or contact us today.
Are you ready to discover the joy of automation?