Index
Using Copilot Cowork requires two separate things: a Microsoft 365 Copilot license, and Copilot Credits.
There are two ways to acquire Copilot Credits:
- Pre-Purchase Plans: buying a package of credits in advance through the Azure portal
- Pay-as-you-go: connecting Copilot Credits to an Azure subscription and being billed for actual consumption
In this blog, we will show the required steps to set up Copilot Credits to allow users in your organization to start using Copilot Cowork.
What do you need before setting up Copilot Cowork billing?
Before doing anything about the Copilot Credits, there are a few things we will need:
- Make sure a Microsoft 365 Copilot premium license is assigned for all the users that will use Cowork. The price for this is $30/user license.
- An Azure subscription. Both billing options (Pre-Purchase Plan and pay-as-you-go) require an Azure subscription before you can proceed.
- Admin access to the Microsoft 365 admin center.
How does Copilot Credits billing work for Copilot Cowork?
Copilot Cowork billing works on basically two layers.
- A fixed cost of $30 per user per month for a Microsoft 365 Copilot premium license. Without this license, users can’t access Cowork.
- Usage-based pricing: On top of the fixed fee for Copilot Premium, organizations will also pay for how much Cowork is actually used based on the tasks that users delegate to Copilot. This is where Copilto Credits come into the picture because each task will consume credits. These credits can be pre-paid or paid as you go. Each credit is around 0.01 USD, it may be a bit less than that if a package is bought in advanced because Microsoft will provide a discount on the packages.
How to pre-purchase plans and pay-as-you-go billing work?
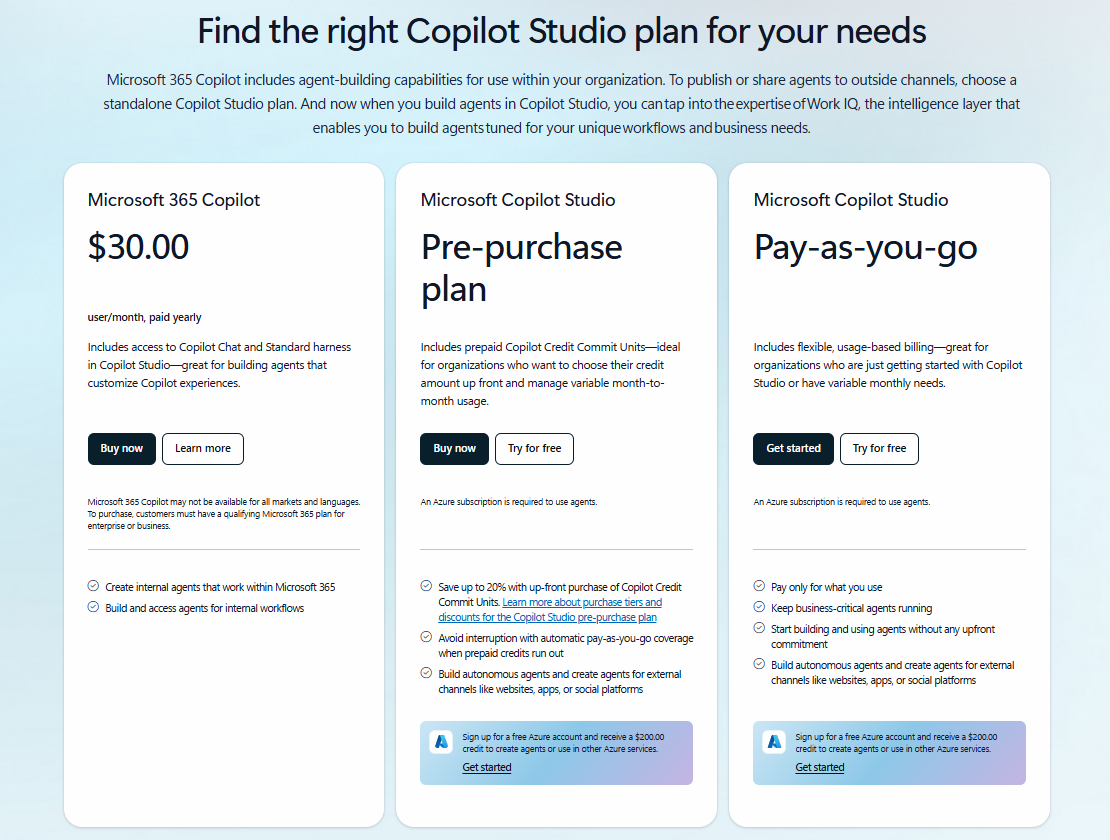
There are two ways to acquire and pay for Copilot Credits:
Pre-Purchase Plans
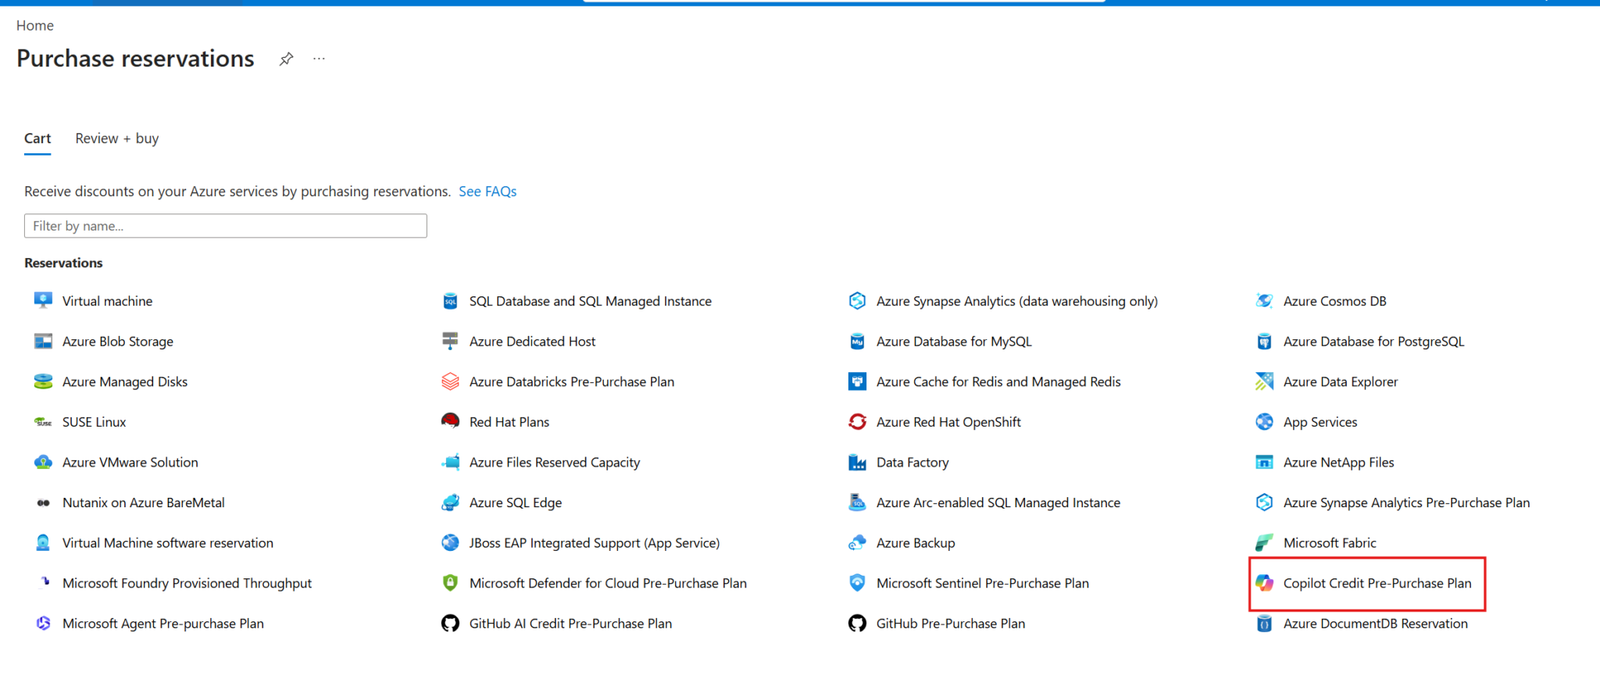
This option requires buying a package of credits in advance through the Azure portal (under Reservations).
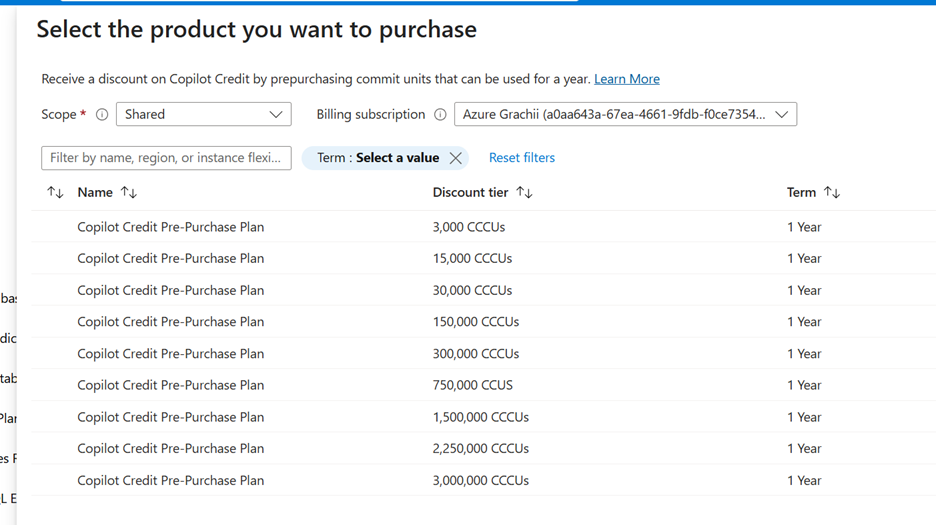
Packages come in different tiers, and larger commitments come with bigger discounts:
Pay-as-you-go
This option connects Copilot Credits directly to an existing Azure subscription, and you’re billed based on actual consumption through a resource group.
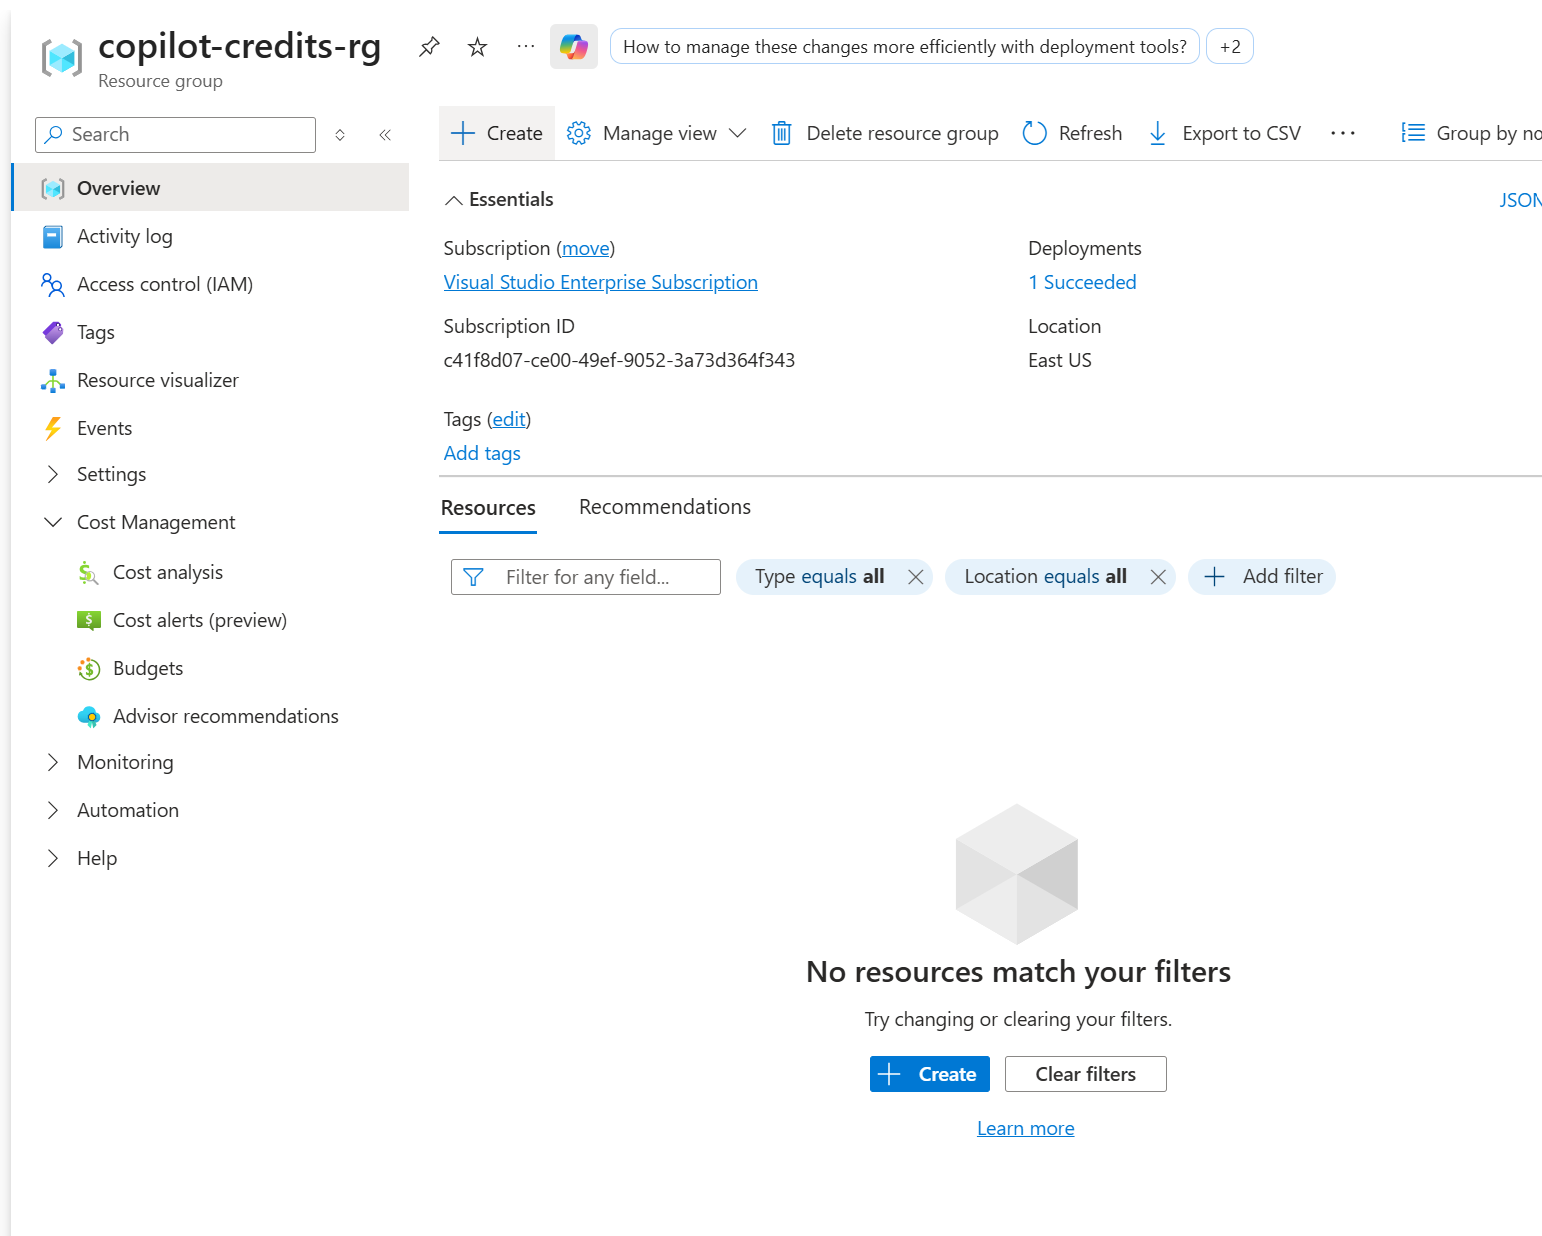
It’s strongly recommended to set spending limits (both per-user and organization-wide to avoid unexpected charges on your invoice.
How to set up usage-based billing for Copilot Cowork
Step 1. Decide between a Pre-Purchase package or Pay-as-you-go
Pre-Purchase Plan (buy in advance):
- Requires an existing Azure subscription
- In the Azure portal, search for Reservations, then select Purchase now and then find the “Copilot Credit Pre Purchase Plan” option
- You’ll see different tiers of Copilot Credit packages. At the time of setup, the lowest available tier was around 300,000 credits, roughly $2,450 USD (each credit is worth about one penny, but discounts are available if the prepaid packages are bought)
- Note: Before August 2026, there were smaller packages available (such as a previous $200/25,000-credit option). When this blog was created, this option was nowhere to be found!
- If you have bought in the past a Copilot Credits package for Copilot Studio or AI Builder in Power Platform, you can use these credits against Copilot Cowork too.
Pay-as-you-go:
- Connects the usage to an existing Azure subscription
- No fixed amount commitment, everything gets billed depending on what users do with Copilot Cowork.
Step 2. Go to the Microsoft 365 Admin Center
Navigate to the Copilot section in your admin center, then to Cowork. If no billing has been configured yet, you’ll see a message indicating that billing needs to be set up before users can access Cowork. Click Setup, which takes you to Cost Management.
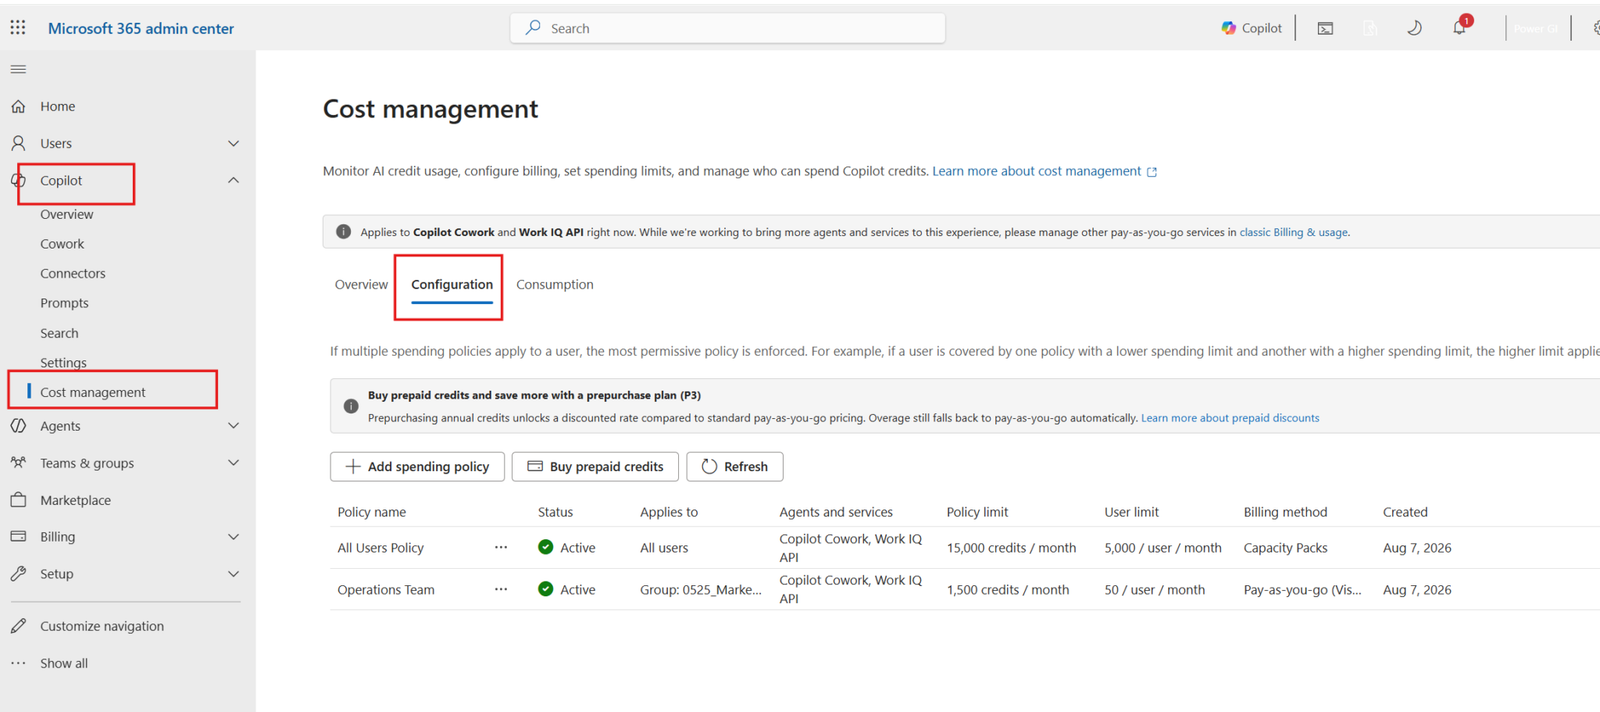
Step 3. Choose your billing method
Click on Get started. You will see a side panel show up. Here you’ll choose how credits will be consumed:
- Use capacity packs: if you’ve already purchased a Pre-Purchase Plan, the available credits will show here.
- Pay-as-you-go: select this and a list of Azure subscriptions linked to your account will appear (for example, a Visual Studio subscription or an enterprise subscription). Whatever Cowork consumes will be billed against the subscription you select here, and invoice details will be tracked there
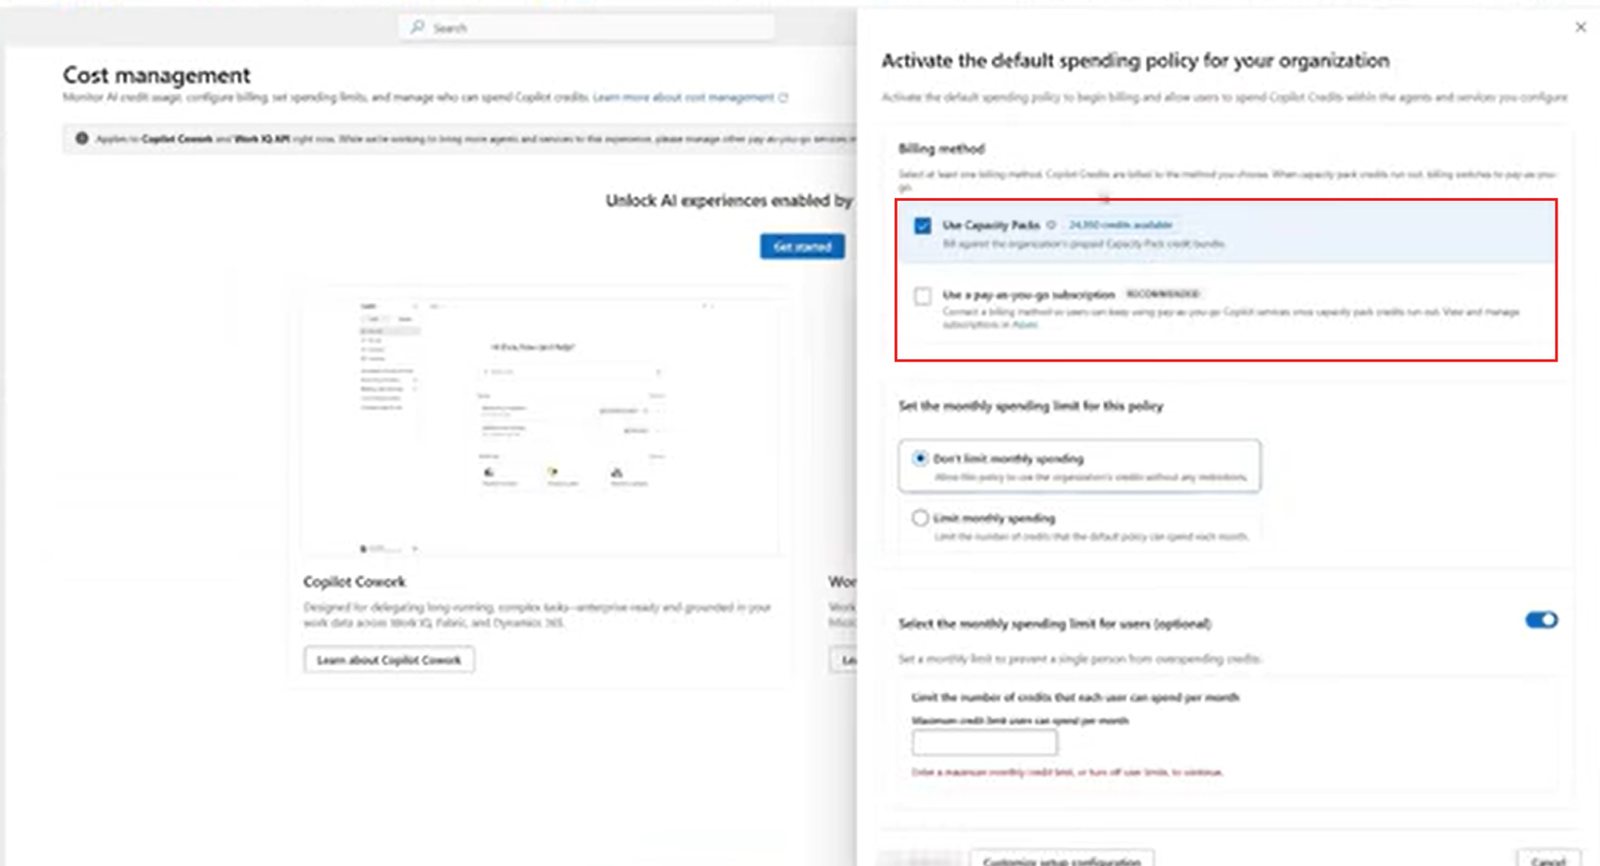
Step 4. Set spending limits and alerts
This step is important if pay-as-you-go was selected, because it will prevent users from using more credits than they should. This set up requires some internal conversations about the per-user budget and the organization budget in general that will be used for AI capabilities.
Key considerations:
- Set a monthly spending limit for the whole policy
- Set a per-user limit
- Set up alerts so you’re notified before you reach the cap
Step 5. Create additional or group-specific spending policies (optional)
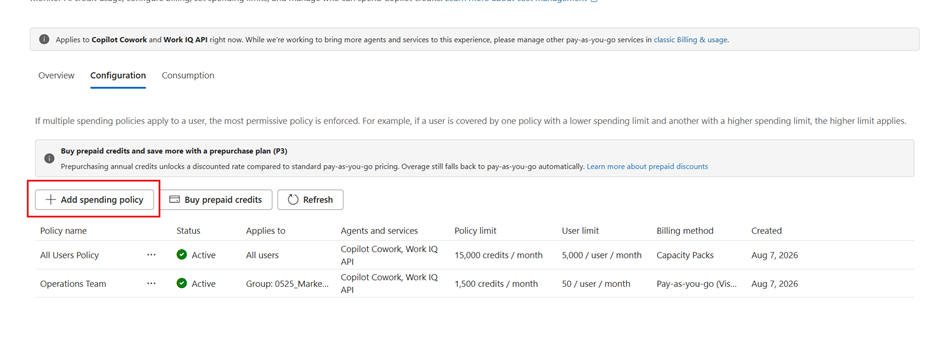
Dedicated policies beyond the default one can be set. For example, a separate policy for a specific group like Marketing or Operations or for certain users (coming soon!).
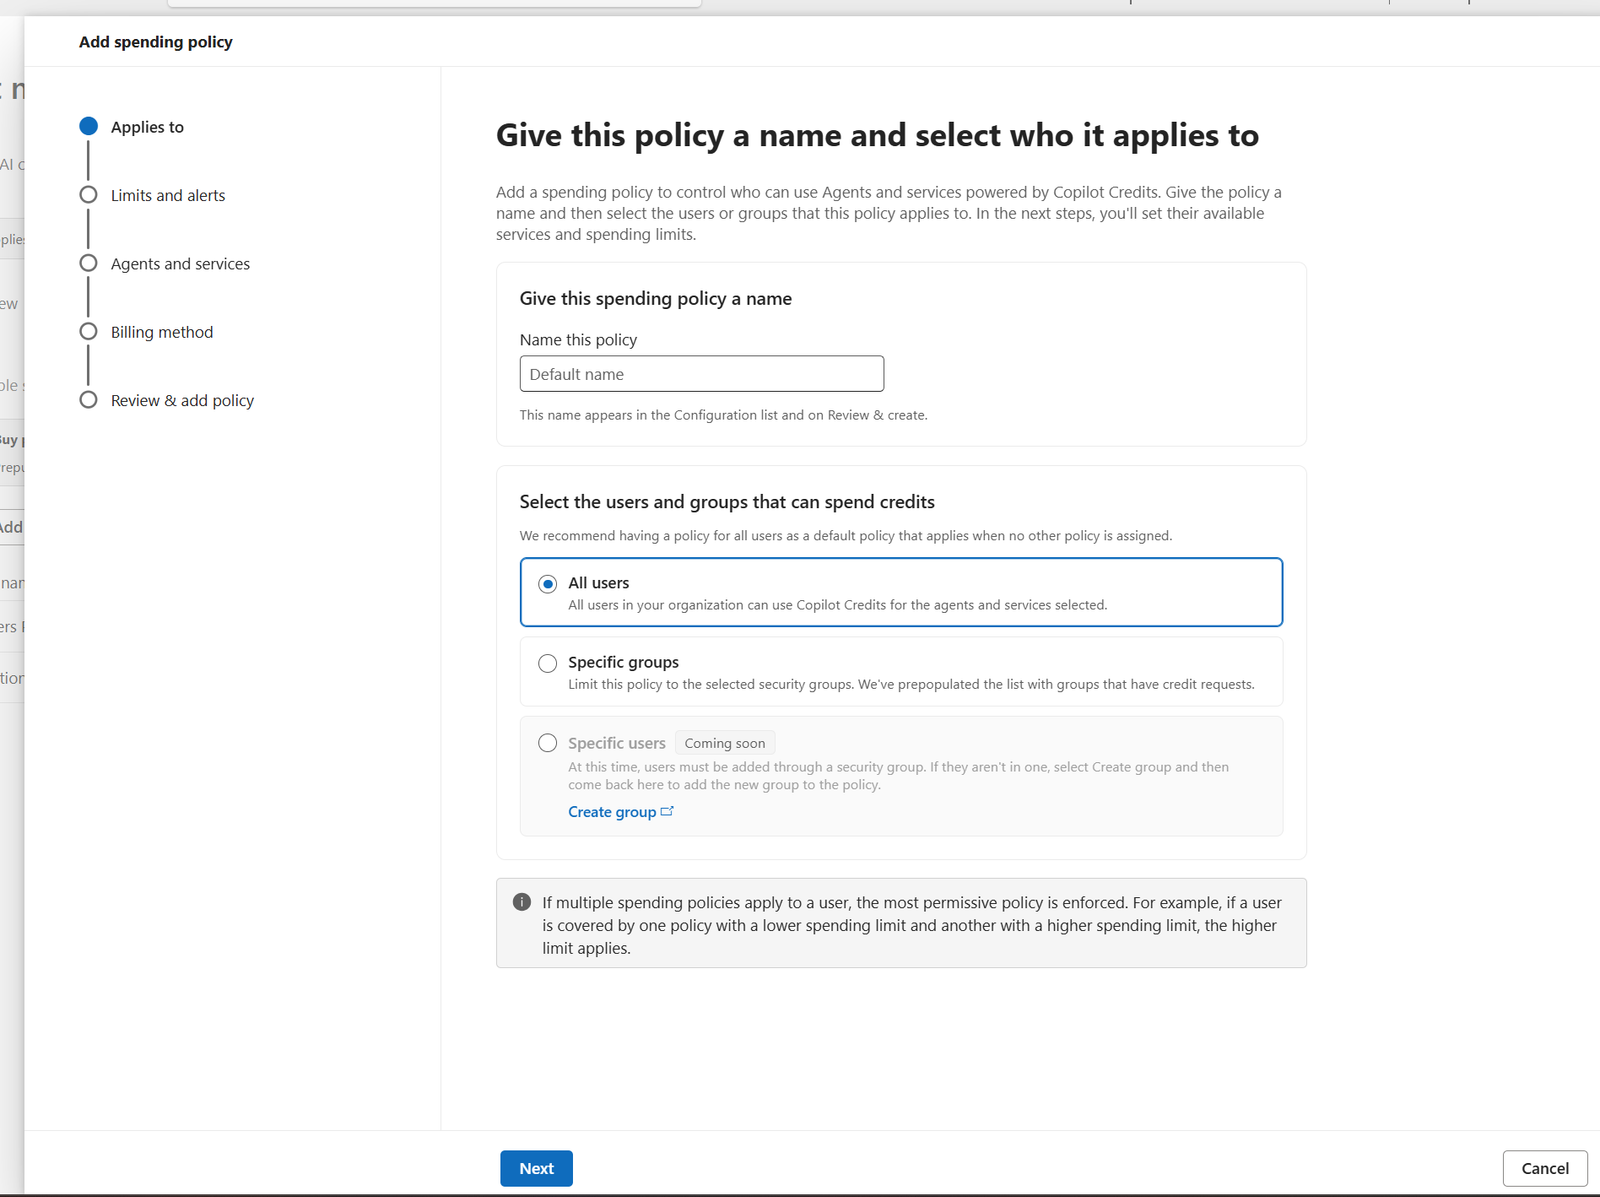
A few things to note:
- You cannot create two policies for the same group (for example, you can’t have two “All users” policies)
- Each policy lets you set its own spending limit and alerts
- You select which services apply to each policy (Copilot Cowork and/or Work IQ API)
- You can choose a billing method for each policy (pre-paid capacity pack or pay-as-you-go)
How do you confirm that Copilot Cowork is available to users?
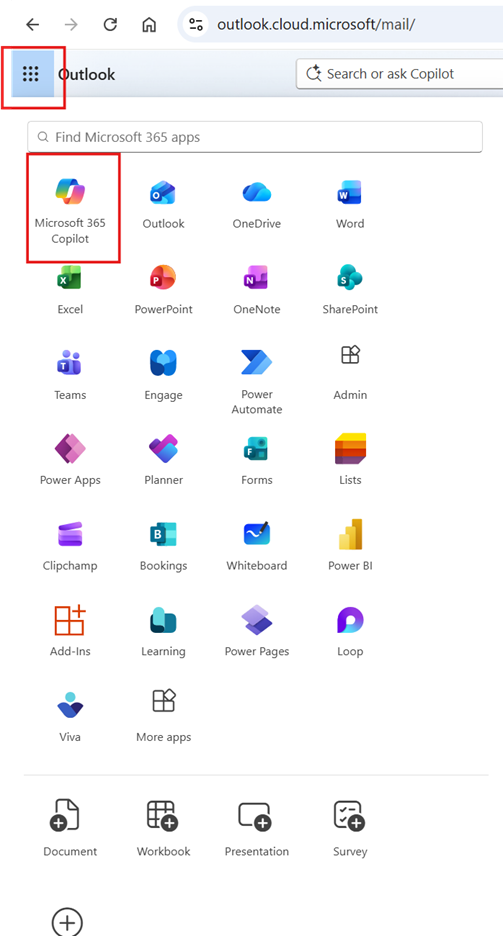
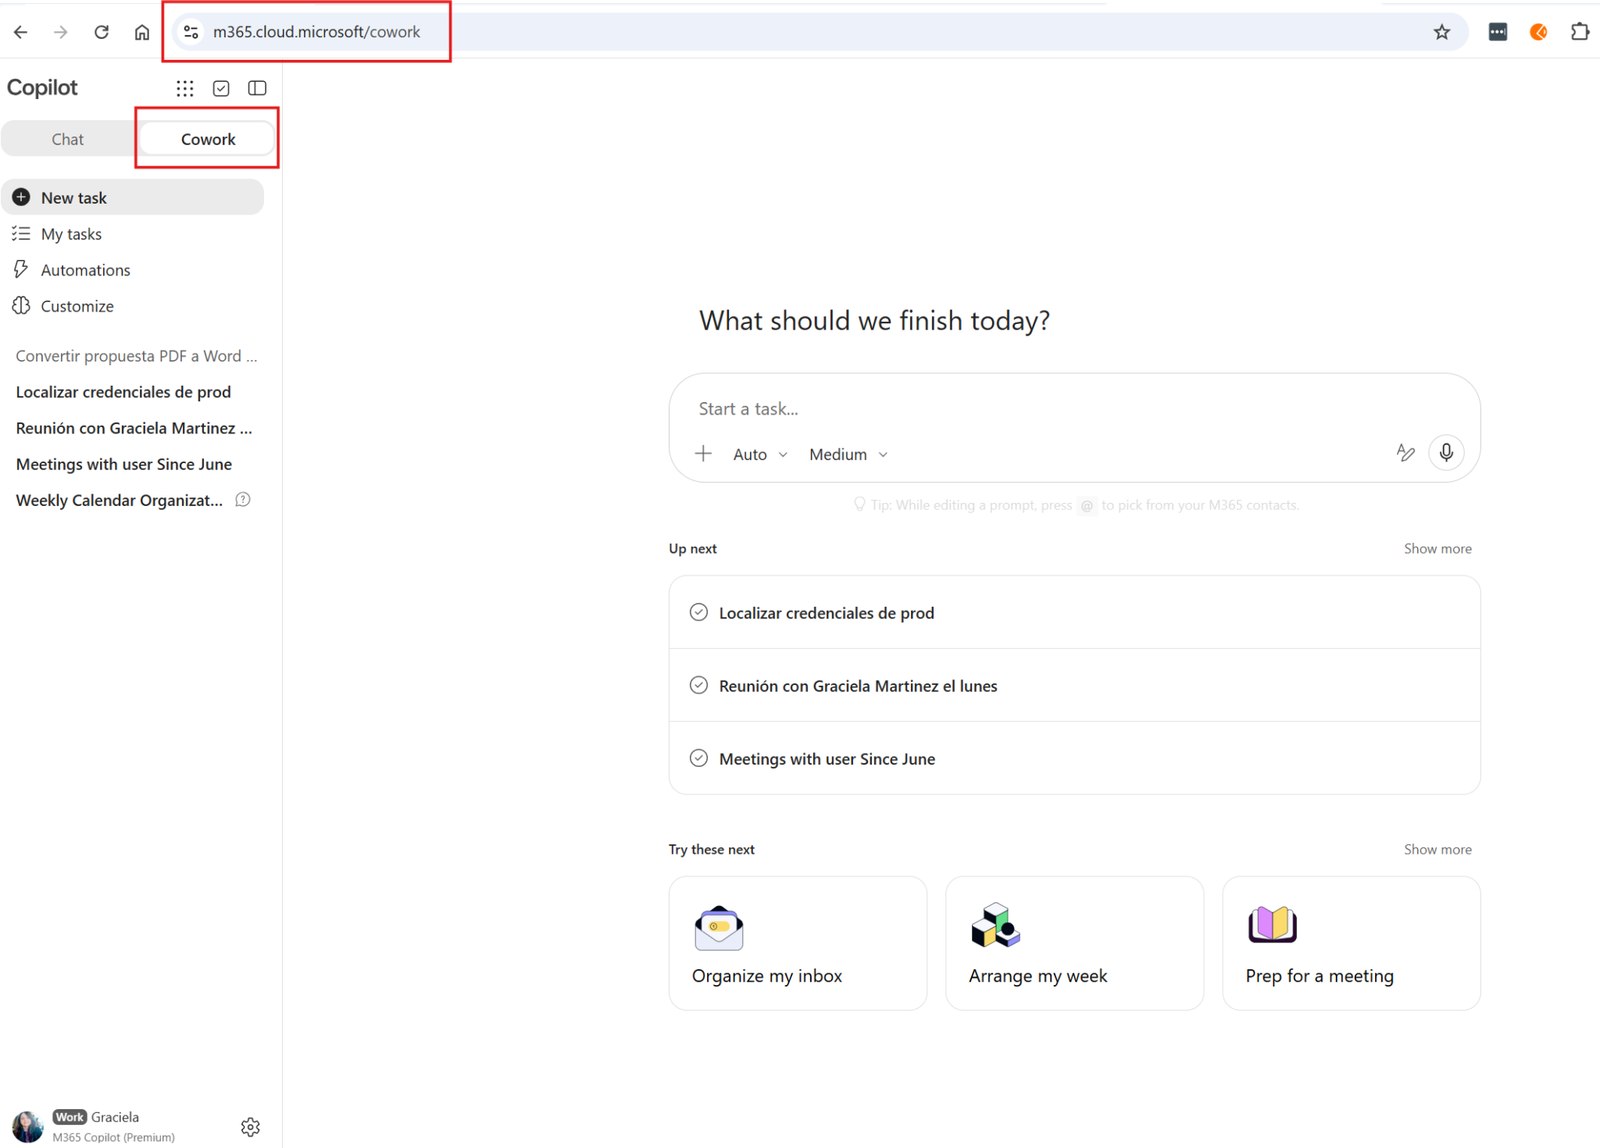
Users can confirm access to Cowork by opening the app launcher (the “waffle” menu) and selecting Microsoft 365 Copilot, or by going to m365.cloud.microsoft.
At the top of that page, there’s a toggle that lets them switch between standard Copilot Chat and Cowork.
Conclusion: Configure Copilot Cowork with PowerGI
Setting up Copilot Credits billing comes down to making decisions: should you buy a pre-paid package or pay on consumption? Should you set up organization-wide policy or build different policies for different teams? We can help you plan and configure all your AI services in the Microsoft 365 ecosystem: from Copilot Premium, to Cowork, AI Builder and Microsoft Foundry.
If you’re ready to roll out Copilot Cowork contact us today and we’ll help you get set up right.